
Andes Mint Cheesecakes Recipe For Chocolate Lovers
Decadent chocolate and cool mint swirl together in these irresistible Andes mint cheesecakes that promise pure dessert magic.
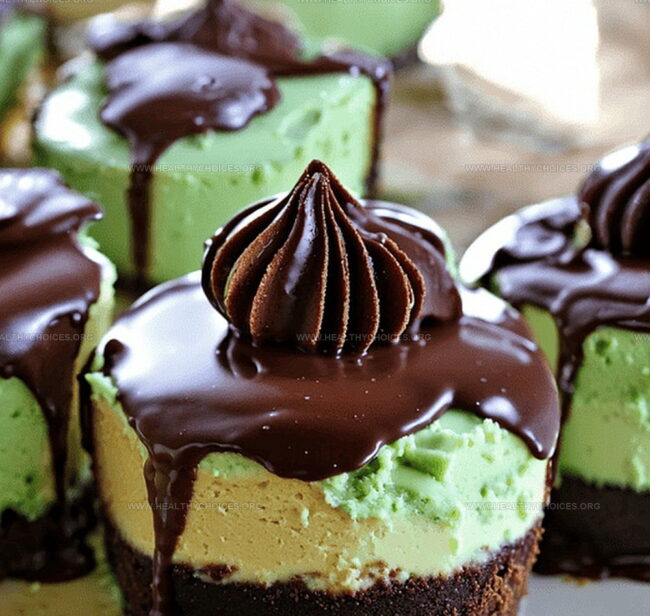
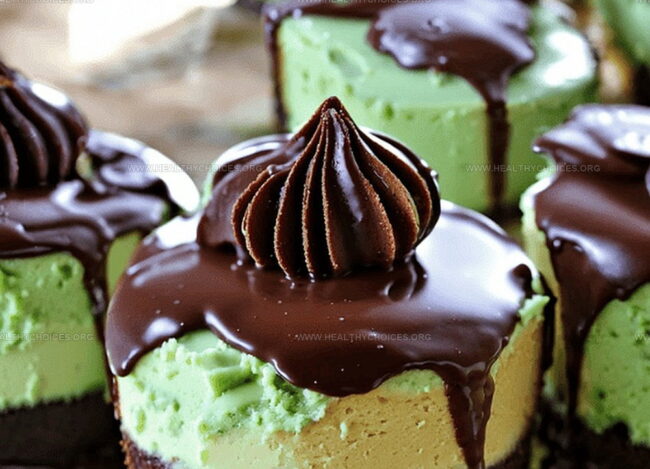
Silky smooth cream cheese blends perfectly with the distinctive flavor of Andes mints, creating a luxurious treat.
Every bite delivers a rich, creamy experience that melts delightfully on your tongue.
the chocolate graham cracker crust adds a delightful crunch that complements the velvety filling.
Delicate green-tinted cheesecake layers showcase the classic mint chocolate combination in an elegant presentation.
These mini desserts pack a punch of flavor that will impress at any gathering.
You’ll love how simple yet stunning these individual cheesecakes can be, making them a perfect sweet indulgence for any occasion.
Quick Recipe Overview
Inside the Ingredients for Andes Mint Cheesecakes
For Crust:For Cheesecake Filling:For Decoration and Flavor Enhancement:Kitchen Tools for Andes Mint Cheesecakes
Steps to Make Andes Mint Cheesecakes
Crush chocolate cookies into fine crumbs and blend with melted butter to form a solid foundation for your mini cheesecakes. Press the mixture firmly into each muffin liner, creating a delectable base that will cradle the creamy filling.
Whip cream cheese until silky smooth, gradually incorporating sugar for sweetness. Introduce peppermint extract to infuse a cool, refreshing essence. Gently fold in eggs, creating a luxurious texture that promises melt-in-your-mouth decadence.
Sprinkle chocolate mint chips throughout the batter, ensuring each bite delivers a burst of cool mint and rich chocolate. For an optional touch of whimsy, add a drop of green food coloring to hint at the mint’s vibrant character.
Place the muffin tin in a preheated oven at 325°F. Bake until the edges are set but the center maintains a gentle wobble, typically 20-25 minutes. This delicate balance ensures a creamy, velvety texture.
Allow cheesecakes to cool completely, then refrigerate for a few hours to develop deep, rich flavors. Before serving, crown each mini cheesecake with a dollop of whipped cream and a sprinkle of chocolate mint chips for a stunning presentation.
Tips & Creative Twists for Andes Mint Cheesecakes
How to Serve Andes Mint Cheesecakes
Storing and Planning with Andes Mint Cheesecakes
Print
Creamy Andes Mint Cheesecakes Recipe
- Total Time: 2 hours 40 minutes
- Yield: 13 1x
Description
Creamy Andes mint cheesecakes combine rich chocolate and cool mint in a delightful dessert. Chocolate graham cracker crusts and silky filling make these mini treats irresistible for you to savor and share.
Ingredients
- 16 oz (454 g) cream cheese, softened
- 1 cup (200 g) granulated sugar
- 2 large eggs
- ½ cup (120 ml) sour cream
- 1 ½ cups (180 g) chocolate cookie crumbs
- ¼ cup (57 g) unsalted butter, melted
- 1 tsp peppermint extract
- ½ cup (85 g) Andes mint chocolate chips
- Green food coloring (optional)
- Whipped cream, for garnish
- Additional Andes mint chocolate chips, for garnish
Instructions
- Prepare Oven and Liners: Set oven to 325°F with a centered rack and line muffin tin with decorative paper liners.
- Create Chocolate Crust: Blend chocolate cookie crumbs with melted butter, pressing firmly into each liner to form a compact base.
- Mix Cream Cheese Base: Whip cream cheese with electric mixer, gradually adding sugar until achieving a light, creamy consistency, then incorporate peppermint extract for refreshing flavor.
- Develop Cheesecake Batter: Integrate eggs individually, ensuring thorough mixing, then gently fold in sour cream and sprinkle mint chocolate chips throughout for delightful texture and taste.
- Fill and Bake: Distribute batter evenly into liners, filling three-quarters full, and bake for 20-25 minutes until center remains slightly jiggly, indicating perfect custard-like consistency.
- Cool and Set: Allow cheesecakes to cool completely at room temperature, then refrigerate for two hours to enhance flavor and achieve ideal texture.
- Garnish and Serve: Top each mini cheesecake with a delicate whipped cream swirl and additional mint chocolate chips for an elegant, irresistible presentation.
Notes
- Smooth Texture Secret: Beat cream cheese at room temperature to prevent lumps and achieve a velvety, luxurious consistency.
- Avoid Overbaking Trap: Watch for slight jiggle in the center, as continued baking will lead to dry, cracked cheesecakes.
- Chill for Perfection: Refrigerate for at least two hours to allow flavors to meld and achieve the ideal creamy texture.
- Prep Time: 15 minutes
- Cook Time: 20-25 minutes
- Category: Desserts
- Method: Baking
- Cuisine: American
Nutrition
- Serving Size: 13
- Calories: 300
- Sugar: 22 g
- Sodium: 210 mg
- Fat: 18 g
- Saturated Fat: 10 g
- Unsaturated Fat: 7 g
- Trans Fat: 0 g
- Carbohydrates: 31 g
- Fiber: 1 g
- Protein: 4 g
- Cholesterol: 70 mg
Emily Roberts
Content Creator & Kitchen Tips Specialist
Expertise
Dietary Planning, Public Health Nutrition, Nutritional Education, Content Development
Education
University of Illinois at Urbana-Champaign
Registered Dietitian Nutritionist (RDN)
Emily Roberts is our content specialist and registered dietitian at HealthyChoices.org. With her Master’s degree in Nutritional Sciences from the University of Illinois and her Registered Dietitian Nutritionist certification, Emily uses her deep nutrition knowledge to write helpful, easy-to-understand guides about healthy eating.
Her warm, practical advice empowers readers to confidently make healthier choices, turning everyday meals into simple moments of wellness and joy.