Crispy Baked Cream Cheese Chicken Taquitos Recipe

Creamy Baked Chicken Taquitos: A Cheesy Homestyle Recipe

Sizzling with flavor and packed with creamy goodness, these baked cream cheese chicken taquitos deliver a mouthwatering twist on traditional Mexican appetizers.

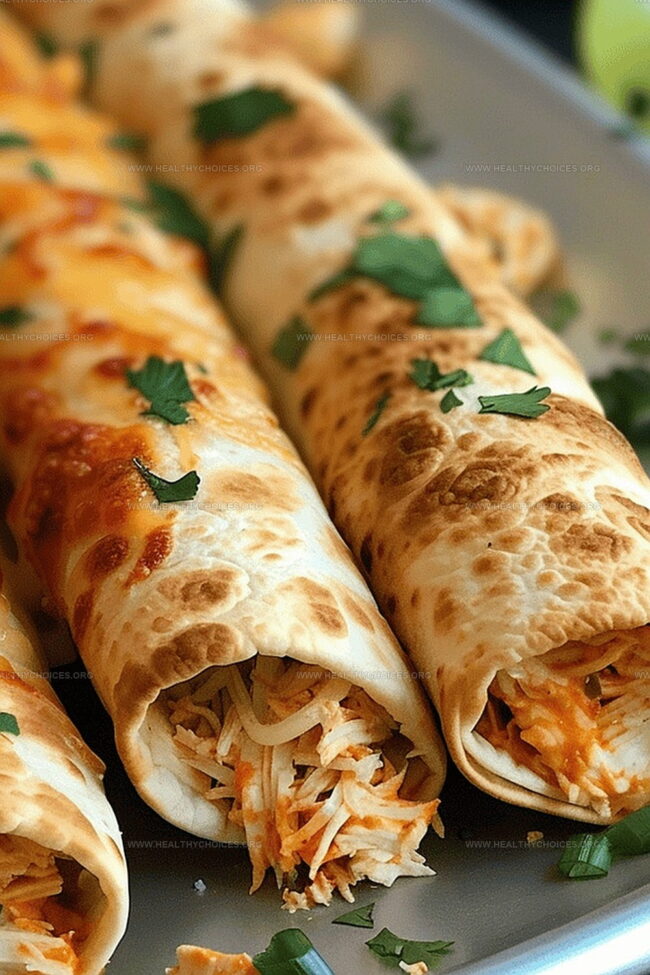
Golden tortillas cradle a rich, tangy filling that melts in your mouth with every bite.

The crispy exterior gives way to a succulent chicken and cream cheese blend that dances with spices and warmth.

Each taquito promises a perfect balance of texture and taste, making them an irresistible snack or party favorite.

Quick to assemble and even faster to devour, these taquitos bring restaurant-quality excitement to your dinner table.

Serve them hot, watch them disappear, and get ready for recipe requests from everyone who takes a bite.

Quick Recipe Overview

Prep Time: 10 minutes

Cook Time: 15-20 minutes

Total Time: 25-30 minutes

Calories: 400 kcal

Servings: 5

Baked Cream Cheese Chicken Taquitos Ingredients

For Protein and Base:
  • Chicken: Tender, shredded meat provides the hearty foundation of the taquitos, best when freshly cooked and pulled apart into soft strands.
  • Flour Tortillas: Flexible and soft wrapping that holds the delicious filling, choose fresh tortillas for the best rolling experience.
For Flavor Enhancers:
  • Cream Cheese: Creamy and rich ingredient that adds smooth texture and tangy depth to the filling.
  • Salsa: Introduces zesty moisture and bright Mexican-inspired flavors to the chicken mixture.
  • Cumin: Earthy spice that brings warm, distinctive southwestern notes to the dish.
  • Chili Powder: Adds a gentle heat and rich color to the filling.
  • Garlic Powder: Provides aromatic and savory undertones without overwhelming other ingredients.
  • Salt: Essential seasoning that balances and elevates all the other flavors.
For Fresh Finishing Touches:
  • Green Onion, Cilantro: Vibrant herbs that deliver fresh, crisp, and herbaceous accents to the taquitos.
  • Lime Juice: Bright citrus element that adds a tangy freshness and helps balance the rich ingredients.
  • Colby Jack Cheese: Melty, mild cheese that adds creamy richness and helps bind the filling together.

What You Need for Chicken Taquitos with Cream Cheese

  • Mixing Bowl: Essential for combining cream cheese, salsa, and chicken mixture.
  • Microwave: Quick tool for softening cream cheese.
  • Baking Sheet: Lined with foil to cook taquitos evenly.
  • Cooking Spray: Prevents taquitos from sticking to the foil.
  • Spoon: Perfect for measuring and spreading chicken filling.
  • Measuring Spoons: Helps accurately portion ingredients.
  • Cheese Grater: Optional, if using freshly grated Colby Jack cheese.
  • Kitchen Knife: Helpful for chopping green onions and cilantro.

How to Cook Baked Cream Cheese Chicken Taquitos

Cheesy Chicken Taquito Adventure

  • Oven Warmup

Crank up the oven to a toasty 425°F, creating the perfect hot zone for our crispy taquito transformation.

  • Flavor Fusion

Blend cream cheese with zesty seasonings and shredded chicken, creating a mouthwatering filling that’ll make taste buds dance with excitement.

  • Taquito Crafting

Lovingly wrap the spicy chicken mixture into soft tortillas, rolling them into delightful little packages of deliciousness.

  • Golden Crisp Finish

Slide the taquitos into the heated oven, watching them turn into crunchy golden treasures that promise pure comfort and flavor.

  • Delicious Presentation

Pull out your crispy creations and dress them up with fresh herbs or your favorite dipping sauce, transforming a simple meal into a celebration of taste.

Extra Tips for Taquitos with Creamy Filling

  • Cheese Lover's Twist: Add an extra layer of cheesy goodness by mixing in sharp cheddar or pepper jack cheese for a more intense flavor profile.
  • Spice Control Station: Adjust the heat level by choosing mild, medium, or hot salsa, and modifying the chili powder amount to suit your personal spice tolerance.
  • Protein Power-Up: Experiment with different protein options like shredded beef, pulled pork, or even black beans for vegetarian friends who want to enjoy these crispy delights.
  • Make-Ahead Magic: Prepare the taquitos ahead of time, cover them tightly, and refrigerate for up to 24 hours before baking. For best results, add 2-3 extra minutes to the baking time when cooking directly from the refrigerator.
  • Crispy Coating Hack: Lightly brush the taquitos with olive oil or melted butter before baking to achieve an extra-golden and crunchier exterior that will have everyone craving more.

Serving Baked Chicken Taquitos with Sauces

  • Dip and Delight: Pair these crispy taquitos with zesty salsa, creamy guacamole, or cool sour cream for an explosion of flavors that complement the rich, cheesy filling.
  • Nacho Night Companion: Serve alongside a fresh Mexican-style salad with crisp lettuce, diced tomatoes, and a tangy lime dressing to balance the taquitos' warm, savory profile.
  • Party Platter Perfection: Arrange the taquitos on a colorful platter with small bowls of various dipping sauces, creating an interactive and inviting appetizer spread for gatherings with friends and family.
  • Fresh Finish: Sprinkle some chopped fresh cilantro or green onions on top just before serving to add a bright, herbal touch that elevates the overall taste and visual appeal of the dish.

Save and Reheat Your Chicken Taquitos

  • Refrigeration Strategy: Store leftover taquitos in an airtight container within the refrigerator for up to 4 days. Stack them carefully with parchment paper between layers to prevent sticking and maintain their crispy texture.
  • Freezer-Friendly Approach: Prepare an extra batch and freeze uncooked taquitos by placing them on a baking sheet, then transferring to a freezer-safe bag. Freeze for up to 3 months, which makes meal planning super convenient for busy families or quick lunch options.
  • Reheating Magic: Bring refrigerated or thawed taquitos back to life by baking in a preheated 375°F oven for 10-12 minutes. Avoid microwaving to maintain their delightful crunchiness and prevent soggy edges.
  • Batch Preparation Tip: Consider making double the recipe and setting aside a portion for future meals. Portion out the filling and roll taquitos in advance, then store them unbaked in the refrigerator for up to 24 hours before cooking, saving precious time during hectic weeknights.
Print
clock clock iconcutlery cutlery iconflag flag iconfolder folder iconinstagram instagram iconpinterest pinterest iconfacebook facebook iconprint print iconsquares squares iconheart heart iconheart solid heart solid icon
Crispy Baked Cream Cheese Chicken Taquitos Recipe

Crispy Baked Cream Cheese Chicken Taquitos Recipe


5 Stars 4 Stars 3 Stars 2 Stars 1 Star

4.7 from 28 reviews

  • Total Time: 25-30 minutes
  • Yield: 5 1x

Description

Cheesy baked cream cheese chicken taquitos promise a Mexican-inspired delight with crispy tortillas and rich filling. Comfort meets convenience in this simple, crowd-pleasing dish you’ll want to make again and again.


Ingredients

Scale
  • 810 small flour tortillas
  • 2 cups (473 ml) chicken (cooked and shredded)
  • 4 oz (113 g) cream cheese
  • 1 cup (237 ml) Colby Jack cheese
  • ⅓ cup (79 ml) salsa
  • 2 tbsps (30 ml) cilantro (finely chopped)
  • 1 tbsp (15 ml) lime juice
  • 1 tbsp (15 ml) green onion (finely chopped)
  • 1 tsp (5 ml) chili powder
  • 1 tsp (5 ml) garlic powder
  • ½ tsp (2.5 ml) cumin
  • ¼ tsp (1.25 ml) salt

Instructions

  1. Preparation: Preheat the oven to 425°F and line a baking sheet with foil, lightly spraying with cooking spray to prevent sticking.
  2. Filling Creation: Soften cream cheese in the microwave, then whisk with salsa, cumin, chili powder, garlic powder, lime juice, and salt until smooth and well-integrated.
  3. Ingredient Incorporation: Fold shredded chicken, Colby Jack cheese, green onions, and cilantro into the seasoned cream cheese mixture, ensuring even distribution of flavors and textures.
  4. Rolling Technique: Lay out flour tortillas, spread the chicken filling along one edge, leaving a small border, then tightly roll each tortilla to encase the ingredients completely, positioning them seam-side down on the prepared baking sheet.
  5. Baking Process: Arrange the rolled taquitos with slight spacing and bake in the preheated oven for 15-20 minutes until the tortillas develop a golden, crispy exterior and achieve a satisfying crunch.
  6. Serving Presentation: Remove taquitos from the oven, allow a brief cooling period, then garnish with fresh cilantro or chopped green onions, and serve with complementary dipping sauces like sour cream, ranch, or salsa for an enhanced culinary experience.

Notes

  • Prep for Success: Softening cream cheese in the microwave ensures a smooth, lump-free filling that blends ingredients seamlessly.
  • Flavor Boost: Generously season the mixture with cumin, chili powder, and lime juice to create a vibrant, zesty taste profile.
  • Rolling Technique: Spread filling carefully near the tortilla’s edge and roll tightly to prevent ingredients from falling out during baking.
  • Crispy Perfection: Space taquitos slightly apart on the baking sheet to allow even heat circulation, creating a uniformly golden and crunchy exterior.
  • Prep Time: 10 minutes
  • Cook Time: 15-20 minutes
  • Category: Lunch, Dinner, Appetizer, Snacks
  • Method: Baking
  • Cuisine: Mexican

Nutrition

  • Serving Size: 5
  • Calories: 400
  • Sugar: 2 g
  • Sodium: 500 mg
  • Fat: 20 g
  • Saturated Fat: 10 g
  • Unsaturated Fat: 8 g
  • Trans Fat: 0 g
  • Carbohydrates: 35 g
  • Fiber: 3 g
  • Protein: 25 g
  • Cholesterol: 70 mg
Emily Roberts

Emily Roberts

Content Creator & Kitchen Tips Specialist

Expertise

Dietary Planning​, Public Health Nutrition, Nutritional Education​, Content Development​

Education

University of Illinois at Urbana-Champaign

  • Degree: Master of Science in Nutritional Sciences
  • Focus: Research on dietary patterns and their impact on chronic diseases.​

Registered Dietitian Nutritionist (RDN)

  • Credential: Expertise in translating nutrition science into practical advice. ​

Emily Roberts is our content specialist and registered dietitian at HealthyChoices.org. With her Master’s degree in Nutritional Sciences from the University of Illinois and her Registered Dietitian Nutritionist certification, Emily uses her deep nutrition knowledge to write helpful, easy-to-understand guides about healthy eating. 

Her warm, practical advice empowers readers to confidently make healthier choices, turning everyday meals into simple moments of wellness and joy.

Leave a Reply

Your email address will not be published. Required fields are marked *

Recipe rating 5 Stars 4 Stars 3 Stars 2 Stars 1 Star