Crispy Rice with Spicy Salmon Recipe

The Easiest Crispy Rice with Spicy Salmon Recipe Ever Made

Crispy rice reimagines ordinary meals into extraordinary culinary adventures, offering a delightful textural contrast that elevates home cooking.

Perfectly golden-brown exteriors give way to tender, fluffy interiors, creating a sensory experience that delights taste buds.

Professional chefs and home cooks alike appreciate this technique for its ability to add unexpected crunch and depth to familiar ingredients.

The method requires patience and precision, turning simple grains into a canvas for bold flavors and creative combinations.

salmon brings its rich, luxurious profile to this dish, complementing the rice satisfying crackle with its buttery smoothness.

Each bite promises a harmonious blend of textures that dance across your palate, surprising and delighting you with every mouthful.

Mastering this technique will unlock a world of culinary creativity that impresses and satisfies.

Ingredients to Make Crispy Salmon Rice

Rice Base:
  • Sushi Rice: Short-grain white rice with sticky texture, perfect for holding together crispy rice pieces.
  • Water: Essential for cooking rice to soft, fluffy consistency.
Rice Seasoning:
  • Rice Vinegar: Adds tangy flavor and helps season rice.
  • Salt: Enhances overall taste profile.
  • Sugar: Balances vinegar's acidity and provides subtle sweetness.
  • Sesame Oil: Introduces nutty, aromatic undertone.
Salmon Mixture:
  • Salmon: Fresh, high-quality fish with rich flavor for topping.
  • Kewpie Mayonnaise: Creamy Japanese-style mayonnaise for smooth texture.
  • Yuzu Kosho: Spicy citrus condiment adding heat and complexity.
  • Yuzu Juice: Bright, citrusy element providing zesty notes.
  • Soy Sauce: Adds umami depth and seasoning.
  • Sesame Oil: Introduces additional nutty flavor.
Garnish and Accompaniments:
  • Cucumber: Fresh, crisp vegetable for textural contrast.
  • Green Onions: Provides sharp, fresh onion flavor.
  • Toasted Sesame Seeds: Adds nutty crunch and visual appeal.
Cooking Medium:
  • Vegetable Oil: Neutral oil for achieving crispy rice texture.

How to Crisp, Stack, and Serve

Step 1: Craft Perfect Sushi Rice

  • Gently rinse rice under cool water 4-5 times until liquid runs crystal clear
  • Cook rice in rice cooker or pot using standard water ratio
  • Whisk together
  • Rice vinegar
  • Sugar
  • Salt
  • Sesame oil

Fold vinegar blend into warm rice until evenly coated

Step 2: Shape Rice Into Crispy Blocks

  • Line rectangular pan with plastic wrap
  • Press seasoned rice into compact half-inch thick layer
  • Refrigerate 3-4 hours or overnight to firm up texture

Step 3: Transform Rice Into Crunchy Bites

  • Slice chilled rice into rectangular pieces
  • Pat rice squares completely dry with paper towels
  • Heat vegetable oil in heavy skillet
  • Fry rice pieces until golden edges emerge
  • Place crispy squares on wire rack to drain excess oil

Step 4: Create Zesty Salmon Topping

  • Dice fresh salmon into small chunks
  • Mix salmon with
  • Kewpie mayonnaise
  • Yuzu kosho
  • Yuzu juice
  • Soy sauce
  • Sesame oil

Blend ingredients until salmon is evenly coated

Step 5: Assemble Elegant Salmon Bites

  • Layer thin cucumber slices on crispy rice
  • Spoon salmon mixture generously on top
  • Sprinkle toasted sesame seeds
  • Garnish with chopped green onions

Serve immediately for maximum crunch and flavor

Tips for Crunch and Heat

  • Rinse Thoroughly: Wash sushi rice multiple times to remove excess starch, ensuring a cleaner, fluffier texture that helps create crispy edges.
  • Chill for Perfection: Refrigerating the rice block allows moisture to evaporate, creating a firmer texture that's ideal for achieving maximum crispiness when frying.
  • Oil Temperature Matters: Use a medium-high heat and watch carefully to get a golden-brown crust without burning the rice pieces.
  • Drain Excess Oil: Let crispy rice pieces rest on a wire rack to maintain their crunchiness and prevent sogginess from trapped oil.
  • Salmon Mixing Technique: Gently fold ingredients together to keep the salmon tender and prevent over-mixing, which can make the topping tough.

Storing and Warming These Bites

  • Refrigerate: Transfer crispy rice and salmon topping to separate airtight containers within 2 hours of cooking. Store salmon mixture in the refrigerator for up to 2 days and crispy rice for 1 day.
  • Reheat Rice: Warm crispy rice in a preheated oven at 375°F for 5-7 minutes to restore crunchiness. Avoid microwaving to prevent soggy texture.
  • Refresh Salmon: Gently warm salmon mixture in a skillet over low heat or enjoy cold for best flavor preservation. Discard if stored longer than 2 days to ensure food safety.

Flavor Matches for Crispy Salmon Rice

  • Pair with Crisp White Wine: A chilled, zesty sauvignon blanc cuts through the richness of the spicy salmon, balancing the crispy rice's texture with its bright, acidic notes.
  • Complement with Japanese Beer: A light, refreshing Sapporo or Asahi provides a clean, smooth backdrop that enhances the dish's umami flavors and cools the palate.
  • Match with Citrus Mocktail: Create a yuzu-based non-alcoholic drink with sparkling water, fresh lime juice, and a hint of ginger to mirror the yuzu kosho's tangy kick.
  • Serve with Cucumber Mint Spritzer: A light, herbaceous drink featuring muddled cucumber and mint complements the dish's fresh ingredients and adds a cooling contrast to the spicy salmon.

Versions of This Trend to Try

  • Spicy Tuna Crispy Rice: Swap salmon for fresh, diced sushi-grade tuna mixed with spicy mayo, creating a classic flavor combination that seafood lovers will adore.
  • Vegetarian Rice Crunch: Replace fish with roasted miso-glazed eggplant or marinated tofu, offering a plant-based alternative that maintains the crispy rice's satisfying texture.
  • Teriyaki Chicken Crispy Rice: Use diced grilled chicken marinated in homemade teriyaki sauce, topped with pickled cucumber for a savory protein-packed option that brings Japanese-inspired flavors.
  • California Roll Crispy Rice: Layer imitation crab, avocado, and cucumber on the crispy rice base, drizzled with spicy mayo to mimic the classic sushi roll's beloved taste profile.

Crispy Rice with Spicy Salmon: A Sushi-Inspired Bite

  • Craft Crunch-Packed Perfection: These crispy rice squares deliver an unbelievably satisfying crunch that transforms ordinary rice into a restaurant-worthy appetizer with minimal kitchen effort.
  • Flavor Explosion in Seconds: The combination of spicy salmon, tangy yuzu, and creamy Kewpie mayonnaise creates a bold taste profile that zings with complex Asian-inspired flavors in every single bite.
  • Quick Gourmet Magic: This recipe turns simple ingredients into an impressive dish that looks and tastes like something from a high-end sushi restaurant, yet takes less than an hour of actual preparation time, making it perfect for entertaining or elevating weeknight dinners.
  • Versatile Crowd-Pleaser: Easily adaptable for different dietary preferences, these bite-sized treats work brilliantly as party appetizers, lunch bites, or elegant starter courses that will wow friends and family with minimal cooking skills required.
Print
clock clock iconcutlery cutlery iconflag flag iconfolder folder iconinstagram instagram iconpinterest pinterest iconfacebook facebook iconprint print iconsquares squares iconheart heart iconheart solid heart solid icon
Crispy Rice with Spicy Salmon Recipe

Crispy Rice with Spicy Salmon Recipe


5 Stars 4 Stars 3 Stars 2 Stars 1 Star

4.6 from 14 reviews

  • Total Time: 35 minutes
  • Yield: 4 1x

Description

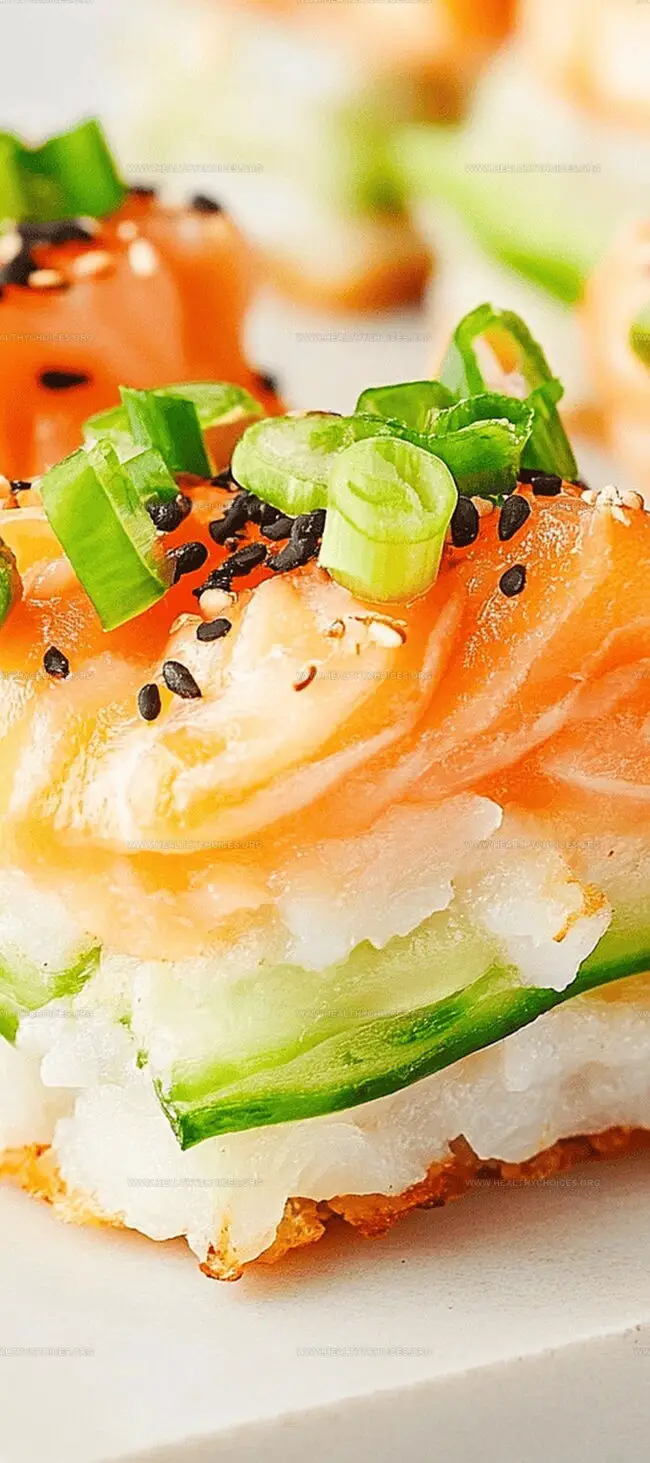
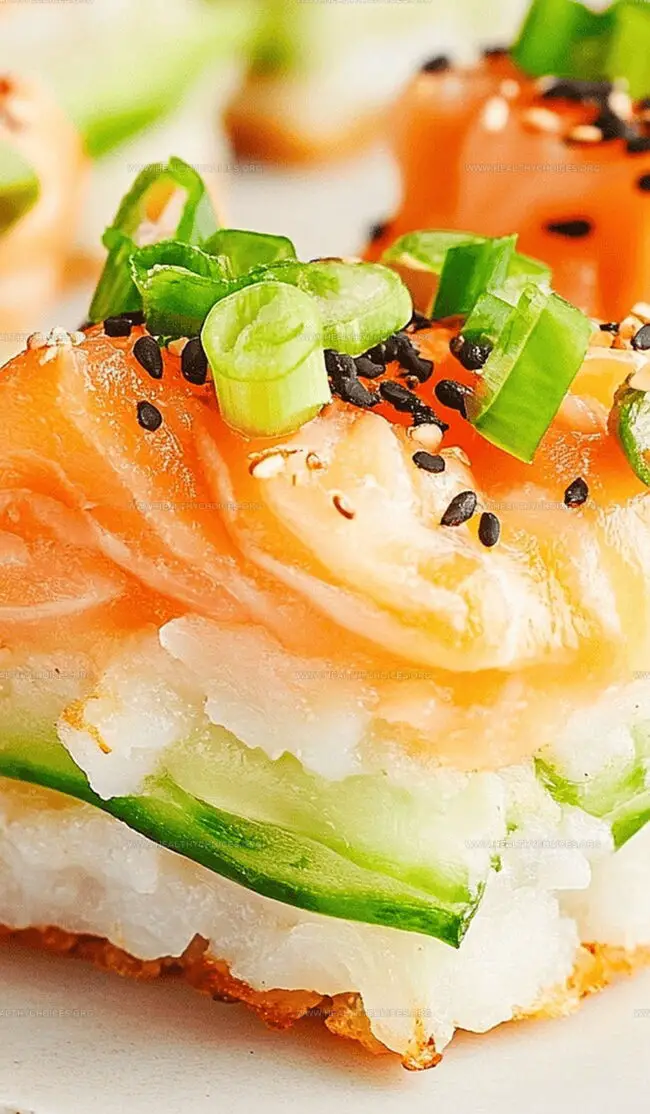
Crispy rice with spicy salmon delivers a perfect harmony of textures and flavors from Japanese cuisine. Crunchy sushi rice creates a golden base for tender, zesty salmon that promises a delightful culinary adventure you’ll crave again and again.


Ingredients

Scale

Crispy Rice with Spicy Salmon

Main Ingredients:

  • 1.5 cups dry short grain sushi rice, rinsed until water runs clear
  • 1 pound sushi-grade salmon
  • 2 cucumbers, halved and thinly sliced
  • 4 stalks green onions, chopped

Seasoning and Liquid Ingredients:

  • 2 cups water
  • 1 teaspoon salt
  • 3 tablespoons rice vinegar
  • 1 tablespoon granulated sugar
  • 1 teaspoon toasted sesame oil
  • 3 tablespoons Kewpie mayonnaise
  • 1 teaspoon yuzu kosho
  • 1 teaspoon yuzu juice
  • 1 tablespoon soy sauce
  • 2 teaspoons sesame oil

Garnish:

  • 2 tablespoons toasted sesame seeds

Instructions

  1. Meticulously rinse sushi rice multiple times until water transforms from cloudy to crystal clear, ensuring pristine grains.
  2. Cook rice in rice cooker or pot with precise water measurement, creating fluffy and uniform texture.
  3. Craft a flavor-enhancing seasoning by whisking rice vinegar, salt, sugar, and sesame oil until completely integrated.
  4. Gently fold seasoning into warm rice, allowing each grain to absorb the aromatic mixture uniformly.
  5. Strategically line a square tray with plastic wrap, pressing rice into a compact, even layer approximately half-inch thick.
  6. Refrigerate rice block for minimum three hours, allowing moisture to evaporate and structure to solidify for optimal frying.
  7. Carefully slice chilled rice block into uniform rectangular segments, patting each piece dry to minimize oil splatter.
  8. Heat vegetable oil in heavy-bottomed skillet, maintaining medium-high temperature for perfect golden-brown transformation.
  9. Delicately place rice blocks into hot oil, frying until edges turn crisp and surface develops a gorgeous amber hue.
  10. Transfer crispy rice onto wire rack, allowing excess oil to drain and maintaining textural integrity.
  11. Combine diced salmon with Kewpie mayonnaise, yuzu kosho, yuzu juice, soy sauce, and sesame oil, creating a vibrant, zesty mixture.
  12. Layer thin cucumber slices atop each crispy rice foundation for refreshing crunch.
  13. Generously spoon spicy salmon mixture onto cucumber-covered rice, ensuring balanced coverage.
  14. Sprinkle toasted sesame seeds and finely chopped green onions as final aromatic garnish.
  15. Serve immediately to preserve optimal temperature and textural contrast.

Notes

  • Plan ahead by chilling the rice for at least 3 hours, allowing it to dry and become perfectly crispy when fried.
  • Use a sharp knife to cut clean, uniform rice rectangles for even cooking and elegant presentation.
  • Pat rice pieces completely dry before frying to ensure maximum crispiness and prevent oil splattering.
  • Choose fresh, high-quality salmon for the best flavor and texture in the spicy topping.
  • Serve immediately after assembling to maintain the rice’s crunchiness and the salmon’s fresh taste.
  • Keep extra vegetable oil at medium-high heat to achieve a golden-brown, crispy rice exterior without burning.
  • Prep Time: 25 minutes
  • Cook Time: 10 minutes
  • Category: Lunch, Dinner, Appetizer
  • Method: Frying
  • Cuisine: Japanese

Nutrition

  • Serving Size: 4
  • Calories: 590
  • Sugar: 4 g
  • Sodium: 700 mg
  • Fat: 32 g
  • Saturated Fat: 6 g
  • Unsaturated Fat: 24 g
  • Trans Fat: 0 g
  • Carbohydrates: 51 g
  • Fiber: 2 g
  • Protein: 27 g
  • Cholesterol: 70 mg
David Bennett

David Bennett

Founder & Head Recipe Developer

Expertise

Culinary Nutrition​, Recipe Development​, Nutritional Counseling​, Food Science​

Education

Johnson & Wales University

  • Degree: Bachelor of Science in Culinary Nutrition
  • Focus: Blending culinary arts with nutritional science to create health-focused cuisine.

Certified Nutrition Specialist® (CNS®)

  • Credential: Advanced certification in personalized nutrition therapy. ​

David Bennett is the lead recipe creator and nutrition expert at HealthyChoices.org, your friendly space for tasty meals that nourish body and mind. 

With a Culinary Nutrition degree from Johnson & Wales University and a Certified Nutrition Specialist® credential, David pairs practical nutrition with delicious cooking, creating recipes you’ll crave daily. 

At Healthy Choices, David shares easy, nutritious dishes and smart cooking tips to make healthy eating something everyone can enjoy, with no complicated diets needed.

Leave a Reply

Your email address will not be published. Required fields are marked *

Recipe rating 5 Stars 4 Stars 3 Stars 2 Stars 1 Star