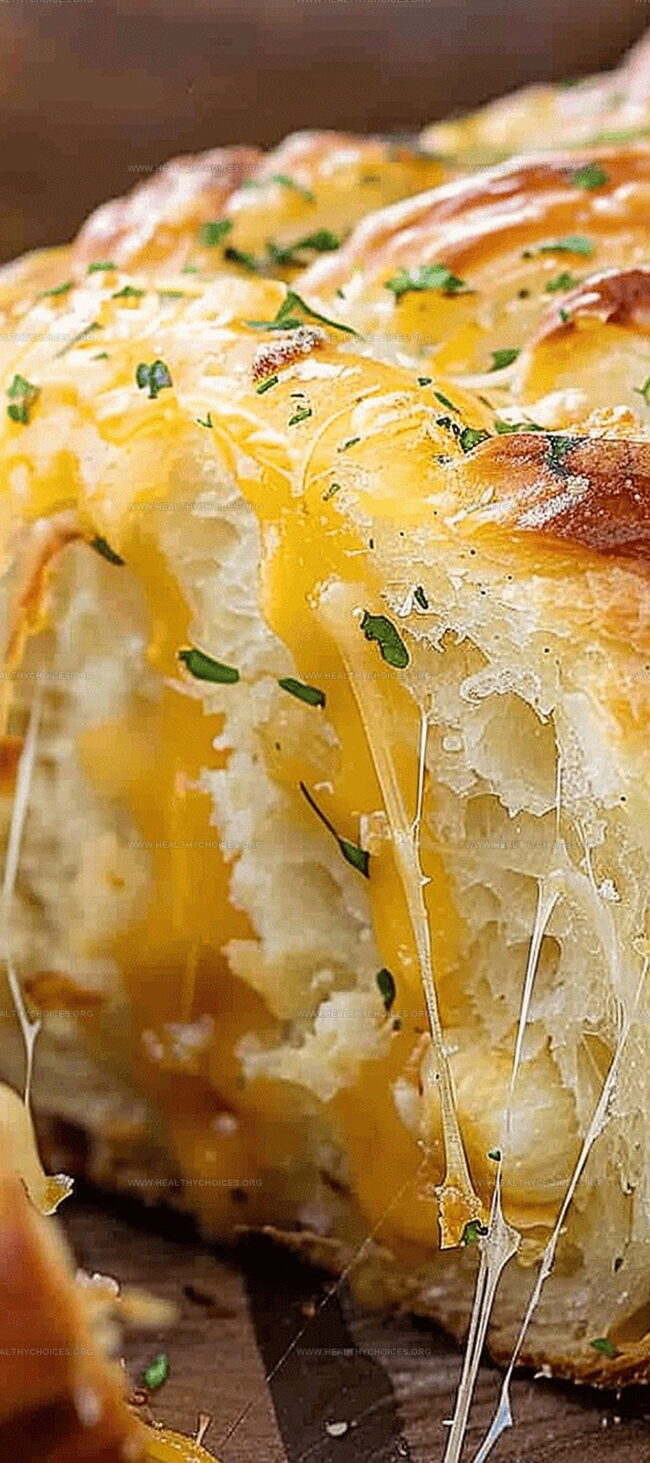
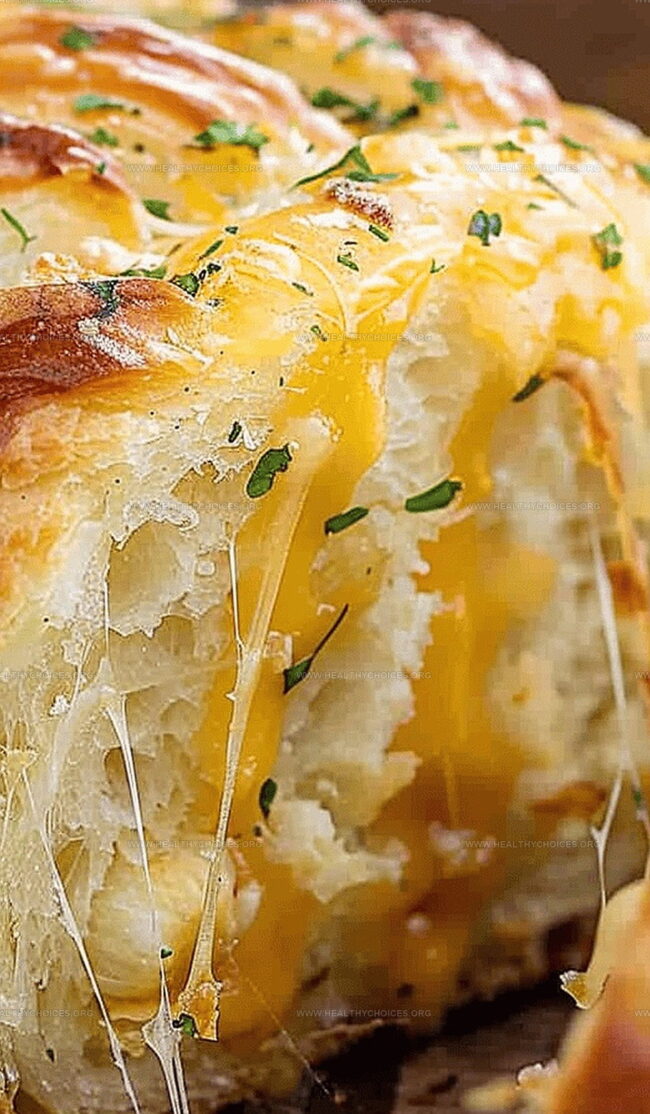
Golden, crusty edges and soft, pillowy centers define this irresistible cheesy garlic pull-apart bread that promises pure comfort.
Fragrant herbs and melted cheese create an aroma that drifts through your kitchen, beckoning everyone closer.
Each layer whispers promises of deliciousness, inviting hungry hands to tear and share.
Warm, buttery bread studded with garlic and herbs becomes an instant crowd-pleaser at any gathering.
The combination of simple ingredients turns this recipe into something magical and utterly addictive.
Crispy on the outside and tender within, this bread delivers pure satisfaction with every single bite.
Get ready to become the hero of your next meal with this irresistible creation.
Quick Recipe Overview
Prep Time: 15 minutes
Cook Time: 30 minutes
Total Time: 45 minutes
Calories: 250 kcal
Servings: 9
Ingredients You’ll Need for Cheesy Garlic Pull-Apart Bread
For Bread Base:
Buttermilk Biscuits: Provides the fluffy foundation for this pull-apart delight, ensuring a soft and tender texture with convenient pre-made dough.
For Flavor Enhancers:
Garlic, Parsley: Brings vibrant herbal and aromatic notes that transform ordinary bread into a zesty, mouth-watering treat; choose fresh garlic for the most intense flavor.
Kosher Salt: Amplifies and balances the overall taste profile, creating depth in every delectable bite.
For Cheesy Goodness:
Mozzarella Cheese, Sharp Cheddar Cheese: Creates a luxurious, melty blend that stretches and adds rich, tangy complexity; opt for freshly grated cheese for maximum melting potential and superior texture.
Unsalted Butter: Ensures a golden, crispy exterior while adding richness and helping cheese and herbs adhere to the bread; room temperature butter works best for even coating.
Tools to Make Cheesy Garlic Pull-Apart Bread
Loaf Pan (9×5-inch): Essential for shaping and baking the pull-apart bread perfectly.
Mixing Bowls (2): One for garlic butter, another for cheese mixture – keeps ingredients organized.
Pastry Brush: Ideal for spreading garlic butter evenly across biscuit layers.
Cheese Grater: Helps create fresh, melty shredded cheese for maximum flavor.
Measuring Spoons: Precise for portioning salt and other seasonings.
Sharp Knife: Useful for chopping fresh parsley.
Spatula: Helps mix ingredients and transfer biscuit layers smoothly.
Baking Instructions for Cheesy Garlic Pull-Apart Bread
Cheese Heaven
Oven Warmup Prepare your kitchen companion by heating to a cozy 350°F and lightly coating a loaf pan with cooking spray.
Flavor Potion Whisk together melted butter with fresh garlic, fragrant herbs, and a pinch of salt to create a magical coating that will make taste buds dance.
Cheese Blend Gather your favorite white and yellow cheeses, mixing them into a tempting mountain of dairy goodness that promises gooey deliciousness.
Bread Transformation Gently separate soft dough circles, lovingly painting each layer with the herbed butter and showering them with cheese until they form a delectable tower.
Baking Magic Slide your creation into the warm oven, first covered to melt the cheese, then uncovered to transform the top into a golden, crispy masterpiece.
Celebration Moment Let the bread rest briefly, then pull apart and savor each cheesy, buttery morsel garnished with a sprinkle of fresh herbs.
Cheesy Garlic Pull-Apart Bread Flavor Ideas
Cooking Tips & Variations
Cheese Swap Magic: Experiment with different cheese combinations like gruyère, parmesan, or pepper jack to create unique flavor profiles that keep your pull-apart bread exciting.
Herb Heaven: Add dried herbs like thyme, rosemary, or Italian seasoning to the garlic butter for an extra layer of aromatic goodness that’ll make your bread even more irresistible.
Protein Power-Up: Sprinkle crispy bacon bits, diced ham, or cooked crumbled sausage between the biscuit layers for a heartier version that works great as a meal accompaniment.
Spice It Up: Mix in red pepper flakes, chopped jalapeños, or a dash of hot sauce to the garlic butter for those who love a little kick with their cheesy bread.
Dipping Delights: Serve alongside marinara sauce, ranch dressing, or a creamy garlic aioli for an extra touch that transforms this bread from great to absolutely phenomenal.
How to Serve Cheesy Garlic Pull-Apart Bread
Party Platter Perfection: Slice this cheesy garlic bread into bite-sized pieces for easy sharing at game nights, potlucks, or casual gatherings with friends.
Dip Delight: Serve alongside marinara sauce, ranch dressing, or a creamy garlic aioli to elevate the flavor experience and provide a delicious dunking option.
Meal Companion: Pair with hearty soups, pasta dishes, or salads to add a warm, comforting side that complements main courses and adds extra excitement to the dining table.
Brunch Brilliance: Transform this bread into a weekend brunch star by serving alongside scrambled eggs, frittatas, or as a standalone appetizer that will impress your morning guests.
Storage Guide for Pull-Apart Bread
Advance Prep Magic: Slice and assemble the entire bread a day before baking, then refrigerate covered with plastic wrap. This strategy lets flavors develop deeper and saves precious cooking time during busy meal preparations.
Quick Reheat Technique: Warm leftover slices in a toaster oven or air fryer for 2-3 minutes to restore crispy edges and melty cheese texture. Avoid microwave reheating, which can make bread soggy and compromise its delightful crunch.
Smart Freezing Strategy: Wrap individual portions or the whole loaf tightly in aluminum foil, then place inside a freezer-safe bag. Frozen bread stays delicious for up to 3 weeks – perfect for unexpected guests or spontaneous snack cravings.
Serving Companion Ideas: Pair warm bread slices with marinara sauce for dipping, serve alongside salads, or use as a fantastic side for soups and pasta dishes. Versatility makes this recipe a crowd-pleasing winner for various meal scenarios.
Homemade cheesy garlic pull-apart bread brings Mediterranean warmth to kitchen gatherings. Layers of golden, buttery dough combine herbs, melted cheese, and aromatic garlic for a crowd-pleasing companion you’ll crave at dinner.
Ingredients
Scale
1 can (8-count) buttermilk biscuits
1 cup mozzarella cheese, shredded
½ cup sharp cheddar cheese, shredded
½ cup unsalted butter, melted (113 g)
1 tbsp garlic, minced
1 tbsp parsley, chopped, plus extra for garnish
½ tsp kosher salt
Instructions
Preparation: Preheat oven to 350°F and grease a loaf pan with cooking spray for effortless bread removal.
Flavor Development: Craft a robust garlic butter by blending melted butter with minced garlic, chopped parsley, and kosher salt, creating an intensely aromatic base for the bread.
Cheese Preparation: Mix shredded mozzarella and cheddar cheeses in a bowl, ensuring an even, luxurious distribution of dairy elements.
Layering Technique: Gently separate biscuits into delicate layers, then meticulously brush each piece with the fragrant garlic butter, strategically positioning cheese between the layers within the prepared pan.
Final Seasoning: Drizzle remaining garlic butter over the layered biscuits, generously sprinkle additional cheese, and cover with foil to prevent excessive browning during initial baking phase.
Baking Process: Place pan in preheated oven, initially covered, and bake until cheese melts completely. Remove foil and continue baking until the surface transforms into a rich, golden-brown with crisp, enticing edges.
Serving: Allow bread to rest briefly after removing from oven, enabling cheese to set and flavors to intensify. Garnish with fresh parsley and serve warm, inviting guests to enjoy the pull-apart texture and garlicky, cheesy experience.
Notes
Butter Technique: Mince garlic finely and whisk with melted butter for maximum flavor infusion and even distribution.
Layer Separation: Gently pull biscuit layers apart to create thin, delicate surfaces that absorb garlic butter and cheese more effectively.
Cheese Melting Strategy: Mix mozzarella and cheddar for a complex, creamy texture that provides rich, gooey consistency when baked.
Baking Protection: Cover with foil initially to prevent burning, then uncover to achieve a perfect golden-brown crispy exterior.
Dietary Planning, Public Health Nutrition, Nutritional Education, Content Development
Education
University of Illinois at Urbana-Champaign
Degree: Master of Science in Nutritional Sciences
Focus: Research on dietary patterns and their impact on chronic diseases.
Registered Dietitian Nutritionist (RDN)
Credential: Expertise in translating nutrition science into practical advice.
Emily Roberts is our content specialist and registered dietitian at HealthyChoices.org. With her Master’s degree in Nutritional Sciences from the University of Illinois and her Registered Dietitian Nutritionist certification, Emily uses her deep nutrition knowledge to write helpful, easy-to-understand guides about healthy eating.
Her warm, practical advice empowers readers to confidently make healthier choices, turning everyday meals into simple moments of wellness and joy.


Emily Roberts
Content Creator & Kitchen Tips Specialist
Expertise
Dietary Planning, Public Health Nutrition, Nutritional Education, Content Development
Education
University of Illinois at Urbana-Champaign
Registered Dietitian Nutritionist (RDN)
Emily Roberts is our content specialist and registered dietitian at HealthyChoices.org. With her Master’s degree in Nutritional Sciences from the University of Illinois and her Registered Dietitian Nutritionist certification, Emily uses her deep nutrition knowledge to write helpful, easy-to-understand guides about healthy eating.
Her warm, practical advice empowers readers to confidently make healthier choices, turning everyday meals into simple moments of wellness and joy.