
Zesty Enchilada Cups Recipe: Fun Handheld Fiesta Bites
Zesty and packed with flavor, these mini enchilada cups bring a spicy twist to traditional Mexican-inspired appetizers.
Bite-sized enchilada cups burst with rich, melted cheese and tender seasoned meat.
Each crispy tortilla shell cradles a delicious filling that packs a serious punch of southwestern goodness.
You’ll love how simple these little handheld treats are to assemble and serve at gatherings.
The combination of crisp edges and soft, savory interior makes them irresistible for game days or casual dinner parties.
These cute cups deliver all the classic enchilada flavors in one convenient, crowd-pleasing package.
Dive into this easy recipe and watch everyone’s eyes light up with the first delectable bite.
Quick Recipe Overview
Enchilada Cups Ingredient Breakdown
For The Tortilla Base:For The Protein And Filling:For Toppings And Garnishes:Must-Have Tools for Enchilada Cups
Baking Directions for Enchilada Cups
Create crispy tortilla bowls by gently pressing them into a muffin tin, giving them a perfect curved shape that cradles the delicious filling.
Brown ground beef in a skillet, breaking it into small pieces until it’s cooked through and packed with savory flavor.
Stir enchilada sauce and zesty seasonings into the beef, then fold in black beans, sweet corn, and spicy jalapeños for a burst of southwestern goodness.
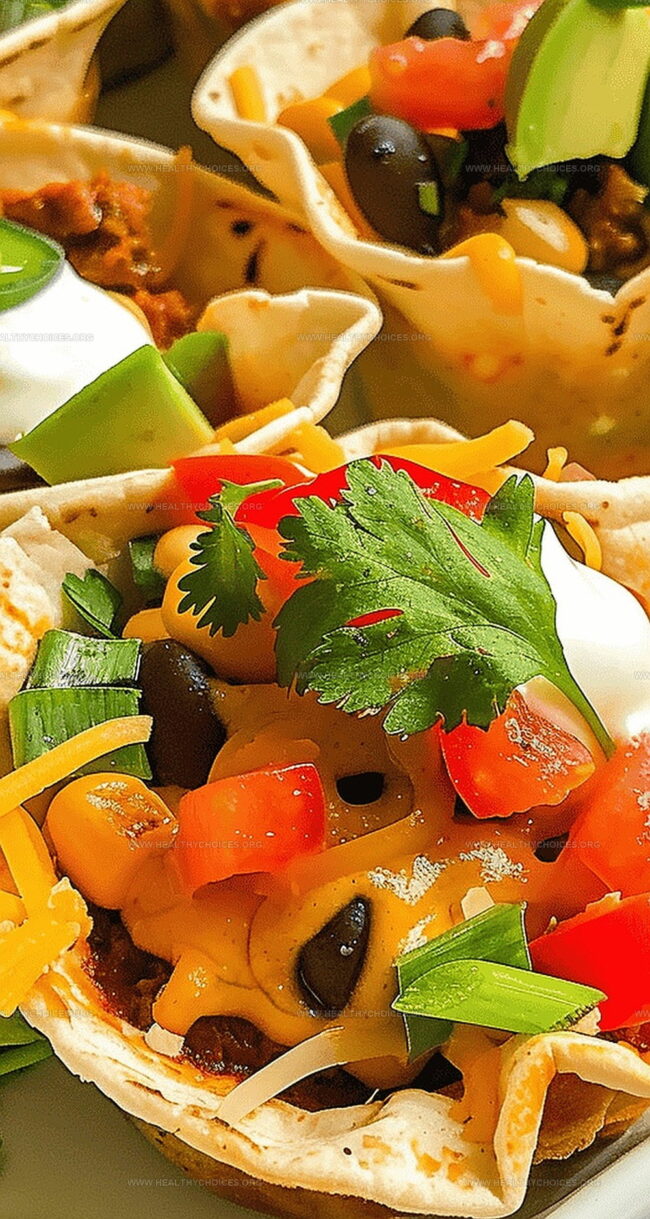
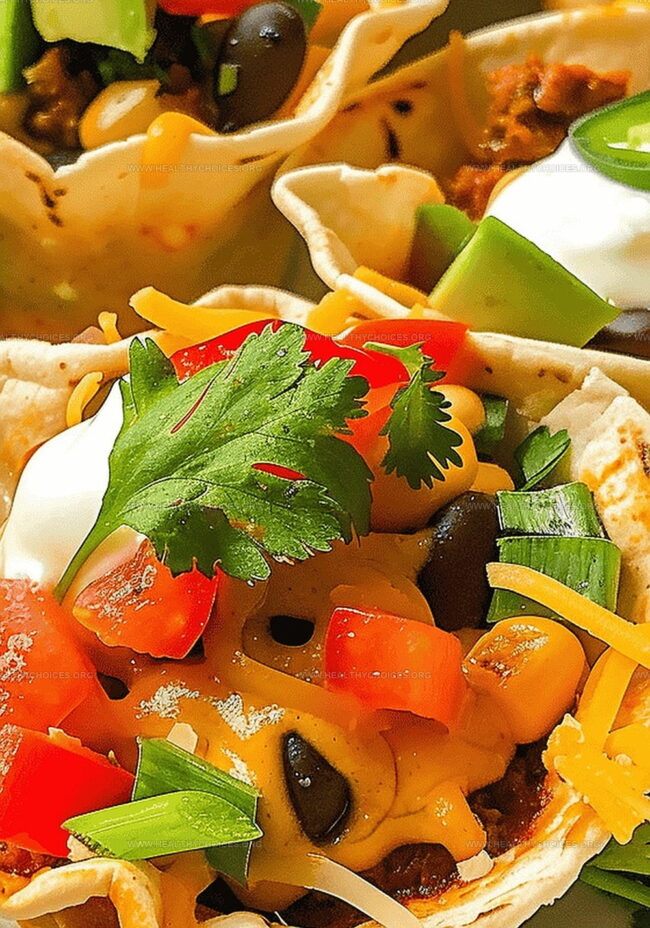
Fill the crispy tortilla cups with the hearty beef mixture and blanket them with a generous layer of melty Mexican cheese.
Add a colorful array of fresh toppings like vibrant cilantro, green onions, juicy tomatoes, creamy sour cream, and smooth avocado slices to elevate these mini flavor bombs.
Pull these sizzling enchilada cups straight from the oven and serve immediately while they’re hot and loaded with mouthwatering ingredients.
Creative Tips for Enchilada Cups
How to Plate Enchilada Cups for Guests
Storing and Reheating Enchilada Cups
Print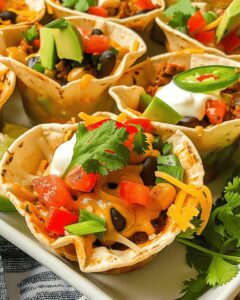
Loaded Enchilada Cups Recipe
- Total Time: 40 minutes
- Yield: 11 1x
Description
Mexican-inspired enchilada cups deliver a compact, flavor-packed appetizer perfect for gatherings. Crispy wonton wrappers cradle spicy chicken, melted cheese, and zesty salsa, inviting friends to savor each delectable bite.
Ingredients
- 1 lb (453 g) ground beef, 80-85% lean
- 1 ½ cups (340 g) shredded Mexican blend cheese
- 10 small flour tortillas
- 10 oz (283 g) red enchilada sauce
- 14 oz (397 g) canned black beans, rinsed and drained
- ½ cup (118 ml) canned whole kernel corn
- 2 tbsps taco seasoning
- ¼ cup (60 ml) sour cream
- ¼ cup (60 ml) chopped pickled jalapeños
- ¼ cup (15 g) chopped fresh cilantro
- ¼ cup (40 g) chopped tomato
- 1 green onion, chopped
- 1 small avocado, cubed
Instructions
- Preparation: Gently press tortillas into muffin tin cavities, using aluminum foil balls to maintain structural shape and create delicate edible vessels.
- Toasting: Roast tortilla shells in a preheated oven at 350°F for 15 minutes until achieving a golden, crisp foundation.
- Meat Fusion: Brown ground meat in a skillet, crumbling thoroughly, then drain excess grease. Integrate enchilada sauce, taco seasoning, black beans, corn, and jalapeños to develop a rich, complex flavor profile.
- Assembly: Generously fill crisp tortilla cups with the seasoned meat mixture, ensuring even distribution without overflowing.
- Cheese Transformation: Sprinkle Mexican cheese blend over filled cups, creating a complete coverage that promises a melted, glossy finish.
- Final Baking: Return muffin tin to the oven for 10 minutes, allowing cheese to melt and develop a bubbling, appetizing surface.
- Garnishing: Adorn the enchilada cups with a vibrant medley of chopped cilantro, green onions, tomatoes, sour cream, and avocado slices to enhance visual appeal and flavor complexity.
- Serving: Present immediately, preserving the crisp texture and warm, inviting essence of the dish.
Notes
- Structural Reinforcement: Use aluminum foil balls to help tortillas maintain shape and prevent collapsing during baking.
- Tortilla Transformation: Prebake tortillas at 350°F for 15 minutes to create crispy, sturdy cups that hold fillings perfectly.
- Meat Preparation: Thoroughly drain excess grease from browned ground beef to prevent soggy, oily cups and ensure a cleaner flavor profile.
- Strategic Cheese Melting: Cover filled cups completely with cheese and bake an additional 10 minutes to achieve a glossy, bubbling top that enhances overall texture and taste.
- Prep Time: 15 minutes
- Cook Time: 25 minutes
- Category: Appetizer, Dinner
- Method: Baking
- Cuisine: Mexican
Nutrition
- Serving Size: 11
- Calories: 413
- Sugar: 3 g
- Sodium: 690 mg
- Fat: 24 g
- Saturated Fat: 10 g
- Unsaturated Fat: 11 g
- Trans Fat: 1 g
- Carbohydrates: 34 g
- Fiber: 7 g
- Protein: 20 g
- Cholesterol: 65 mg
Emily Roberts
Content Creator & Kitchen Tips Specialist
Expertise
Dietary Planning, Public Health Nutrition, Nutritional Education, Content Development
Education
University of Illinois at Urbana-Champaign
Registered Dietitian Nutritionist (RDN)
Emily Roberts is our content specialist and registered dietitian at HealthyChoices.org. With her Master’s degree in Nutritional Sciences from the University of Illinois and her Registered Dietitian Nutritionist certification, Emily uses her deep nutrition knowledge to write helpful, easy-to-understand guides about healthy eating.
Her warm, practical advice empowers readers to confidently make healthier choices, turning everyday meals into simple moments of wellness and joy.