
Easy Rosemary Garlic Pull Apart Bread Recipe: Irresistible Bites
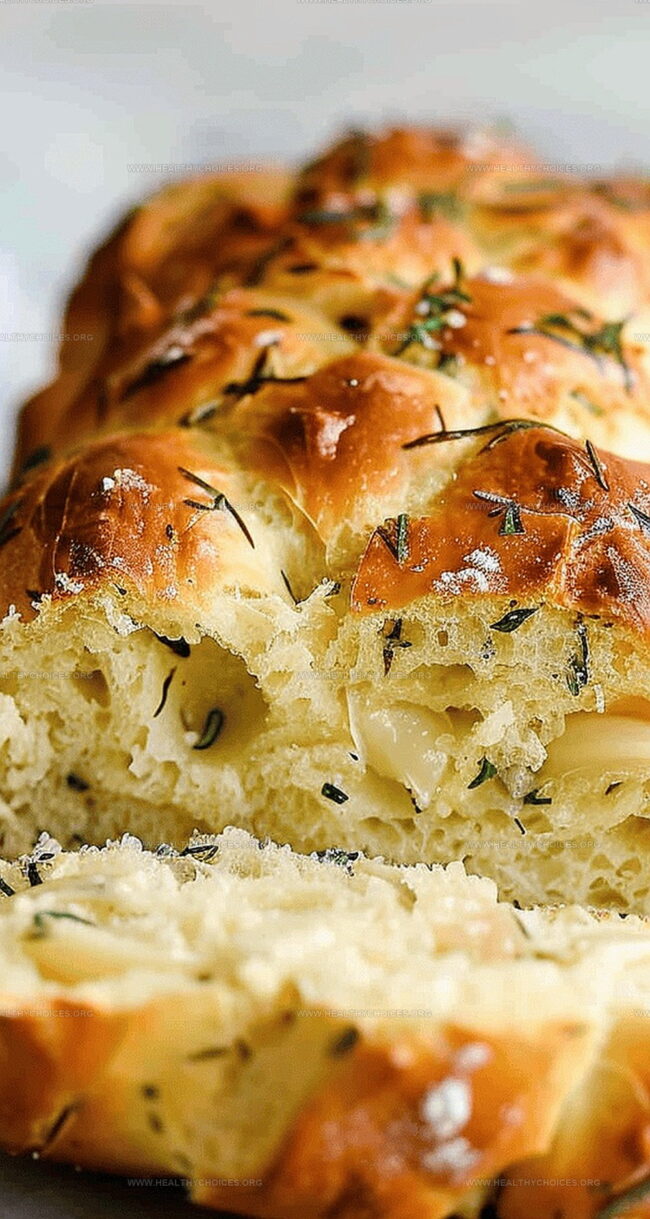
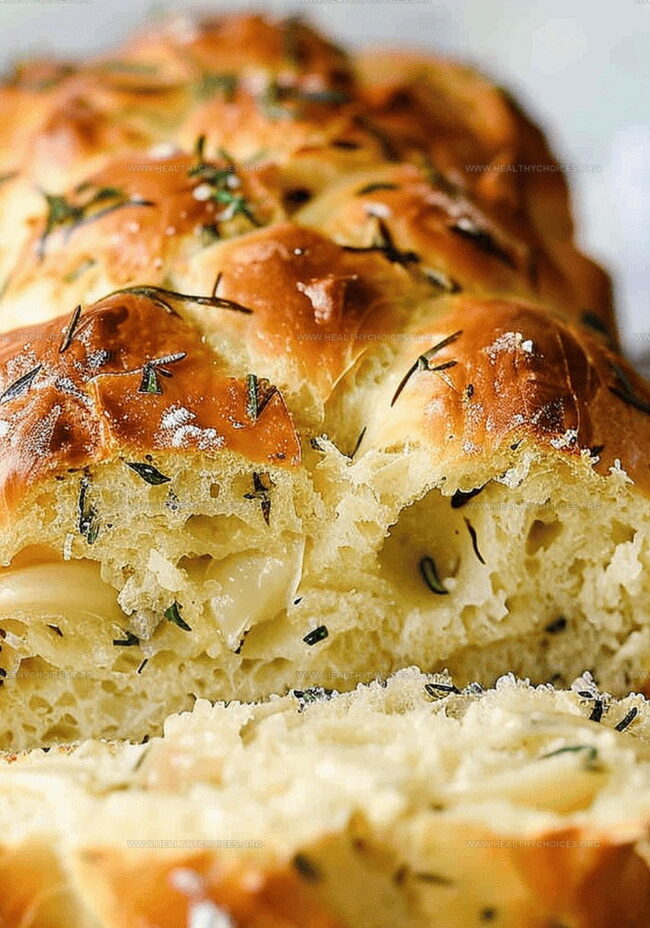
Rosemary garlic pull apart bread refines ordinary ingredients into a culinary masterpiece that tantalizes taste buds and sparks conversation around any dining table.
Bold herb-infused aromas waft through kitchens, promising delectable sensations with each torn morsel.
Soft, pillowy layers beckon hungry guests to break bread together in delightful communal moments.
Fragrant rosemary and robust garlic intertwine, creating a symphony of Mediterranean-inspired flavors that dance across palates.
Home cooks can easily craft this showstopping side dish that looks complex but requires minimal technical skill.
Inviting golden-brown edges promise crispy exterior textures that contrast beautifully with tender inner crumbs.
Warm, comforting, and utterly irresistible, this bread elevates casual meals into memorable gatherings.
Why Rosemary Garlic Pull Apart Bread Is Worth the Effort
Ingredients for Herb-Packed, Buttery Pull Apart Bread
Main Dough Ingredients:Seasoning Ingredients:Cheese and Filling Ingredients:How to Shape and Bake Soft Pull Apart Bread
Step 1: Activate the Yeast
Combine yeast and sugar in a stand mixer bowl. Warm milk to 110°F and pour over yeast mixture. Whisk gently and cover with a kitchen towel. Let sit for 5-10 minutes until foamy and bubbly.
Step 2: Create the Dough Base
Add ingredients to the yeast mixture:Mix on low speed for 3 minutes until soft and smooth.
Step 3: Knead to Perfection
Continue kneading using dough hook for 5 minutes. If too sticky, add flour one teaspoon at a time. Dough is ready when it slowly springs back after being poked.
Step 4: First Rise
Shape dough into a ball and place in a greased bowl. Cover with plastic wrap. Let rise in a warm spot until doubled in size, about 60-90 minutes.
Step 5: Prepare Flavor-Packed Filling
Mix together in a medium bowl:Cover and set aside at room temperature.
Step 6: Shape and Fill
Punch down dough and transfer to floured surface. Divide into 12 equal pieces. Flatten each piece into a 4-inch circle. Spread filling on each circle and sprinkle with cheese. Fold circles in half and arrange in a greased 9×5-inch loaf pan.
Step 7: Second Rise
Cover pan with plastic wrap. Let dough rise again in a warm spot until puffy, about 45 minutes.
Step 8: Bake to Golden Perfection
Preheat oven to 350°F. Place rack in lower third of oven. Bake for 50 minutes until golden brown. Cover with foil if top browns too quickly. Optional: Brush with melted butter and sprinkle sea salt.
Step 9: Cool and Serve
Let bread cool in pan for 10 minutes. Transfer to wire rack. Serve warm and enjoy!
Step 10: Storage Tips
Store at room temperature for 2 days or refrigerate for up to 1 week. Reheat at 300°F for 10-15 minutes or microwave until warm.
Tips for Even Rising and Flavorful Crusts
Best Ways to Keep Pull Apart Bread Fresh and Fluffy
Soups and Mains That Go Great with Rosemary Garlic Bread
Twists to Try with Cheese, Herbs, or Dough
Print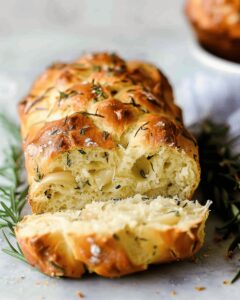
Rosemary Garlic Pull Apart Bread Recipe
- Total Time: 1 hour 20 minutes
- Yield: 12 1x
Description
Rosemary garlic pull apart bread brings Mediterranean warmth to your kitchen with fragrant herbs and rich flavors. Layers of buttery dough infused with aromatic rosemary and roasted garlic create an irresistible companion for sharing and savoring together.
Ingredients
Main Ingredients:
- 2 and ⅓ cups (291g) all-purpose flour
- 1 cup (240ml) whole milk
- 3 tablespoons (43g) unsalted butter
- 1 large egg
- 1 cup (95g) shredded parmesan, mozzarella, or white cheddar cheese
Seasoning and Flavoring Ingredients:
- 2 teaspoons platinum yeast from Red Star
- 1 tablespoon granulated sugar
- 1 teaspoon salt
- 1 teaspoon garlic powder
- 2 tablespoons finely chopped fresh rosemary
- 1 tablespoon finely chopped fresh parsley
- 2 garlic cloves, minced
Topping and Filling Ingredients:
- 6 tablespoons (86g) unsalted butter
- ¼ teaspoon salt
- 1 tablespoon melted butter
- Coarse or flaky sea salt for sprinkling
Instructions
- Activate the yeast by combining it with sugar in a stand mixer bowl, then gently pour warm milk over the mixture and allow it to become frothy for 5-10 minutes.
- Incorporate softened butter, egg, flour, salt, garlic powder, and rosemary into the bowl, mixing on low speed until a soft dough forms.
- Knead the dough using the mixer or by hand, adding small amounts of flour if too sticky, until the texture becomes smooth and elastic with a slight bounce-back when pressed.
- Transfer the dough to a greased bowl, cover, and let it rise in a warm environment until it doubles in volume, approximately 60-90 minutes.
- Prepare the filling by blending softened butter with rosemary, parsley, garlic, and salt, setting it aside at room temperature.
- Deflate the risen dough and divide it into 12 equal portions, flattening each piece into a circular shape.
- Spread herbed butter on each dough circle, sprinkle with cheese, then fold into half-moon shapes.
- Arrange the folded dough pieces in a greased loaf pan with rounded sides facing upward.
- Allow the arranged bread to undergo a second rise, covered, until puffy and expanded, around 45 minutes.
- Preheat the oven to 350°F, positioning the rack in the lower third, and bake the bread until golden brown, approximately 50 minutes.
- Protect the bread’s surface with foil if browning too quickly, and optionally brush with melted butter and sea salt.
- Let the bread cool in the pan for 10 minutes before transferring to a wire rack, then serve warm.
- Store leftovers at room temperature for two days or refrigerate for up to a week, reheating in the oven or microwave before serving.
Notes
- Activate yeast precisely at 110°F to ensure perfect bread rise and soft texture.
- Handle dough gently, adding flour sparingly to maintain a slightly tacky consistency for optimal bread structure.
- Create uniform dough circles by using a ¼ cup measure for consistent sizing and even baking.
- Protect bread’s golden crust by tenting with foil if browning too quickly during baking.
- Restore bread’s freshness by reheating at 300°F for 10-15 minutes before serving.
- Enhance flavor by brushing warm bread with melted butter and sprinkling sea salt for a gourmet finish.
- Prep Time: 30 minutes
- Cook Time: 50 minutes
- Category: Snacks, Appetizer
- Method: Baking
- Cuisine: Italian
Nutrition
- Serving Size: 12
- Calories: 210
- Sugar: 2g
- Sodium: 290mg
- Fat: 10g
- Saturated Fat: 6g
- Unsaturated Fat: 4g
- Trans Fat: 0g
- Carbohydrates: 25g
- Fiber: 1g
- Protein: 6g
- Cholesterol: 30mg
David Bennett
Founder & Head Recipe Developer
Expertise
Culinary Nutrition, Recipe Development, Nutritional Counseling, Food Science
Education
Johnson & Wales University
Certified Nutrition Specialist® (CNS®)
David Bennett is the lead recipe creator and nutrition expert at HealthyChoices.org, your friendly space for tasty meals that nourish body and mind.
With a Culinary Nutrition degree from Johnson & Wales University and a Certified Nutrition Specialist® credential, David pairs practical nutrition with delicious cooking, creating recipes you’ll crave daily.
At Healthy Choices, David shares easy, nutritious dishes and smart cooking tips to make healthy eating something everyone can enjoy, with no complicated diets needed.