
Tangy Bruschetta Cheese Ball Recipe: A Party Favorite
Parties come alive with vibrant appetizers that spark conversations and delight taste buds, and this bruschetta cheese ball recipe delivers pure culinary magic.
Creamy cheese blends seamlessly with zesty Italian herbs and sun-ripened tomatoes, creating an irresistible spread that begs to be devoured.
Fresh basil and garlic dance together, infusing each bite with Mediterranean warmth and depth.
The combination of soft cheese and crisp toasted bread creates a textural symphony that feels both elegant and comfortably rustic.
Packed with bright flavors and simple ingredients, this appetizer transforms ordinary gatherings into memorable celebrations.
Serve this crowd-pleasing cheese ball alongside crusty bread or crackers, and watch as guests eagerly dive in for seconds.
Quick Recipe Overview
Ingredients for Bruschetta Cheese Ball
For Creamy Base:For Flavor Enhancers:For Coating and Garnish:Tools to Make Bruschetta Cheese Ball
How to Assemble a Bruschetta Cheese Ball
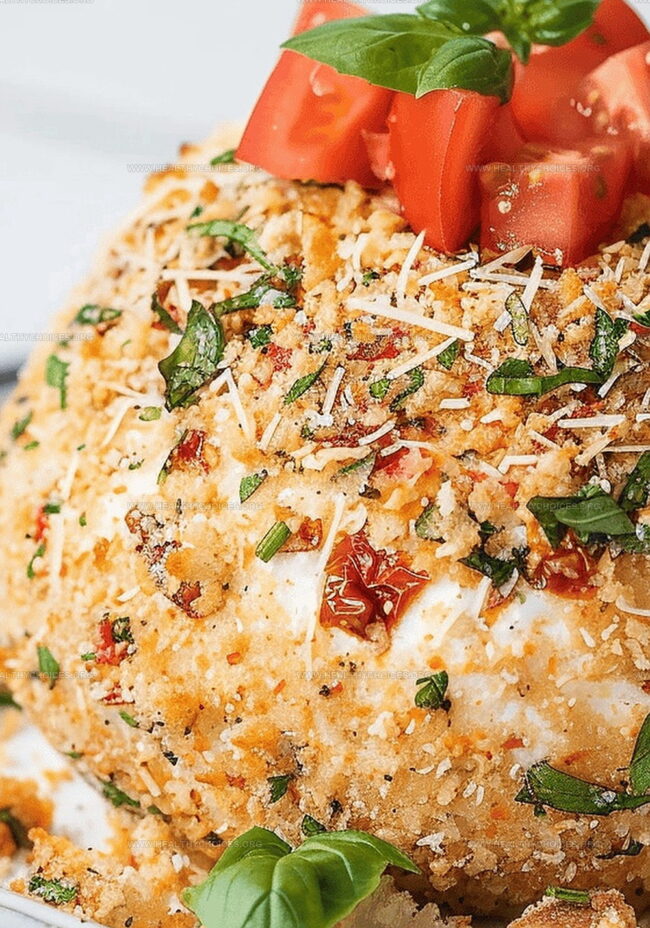
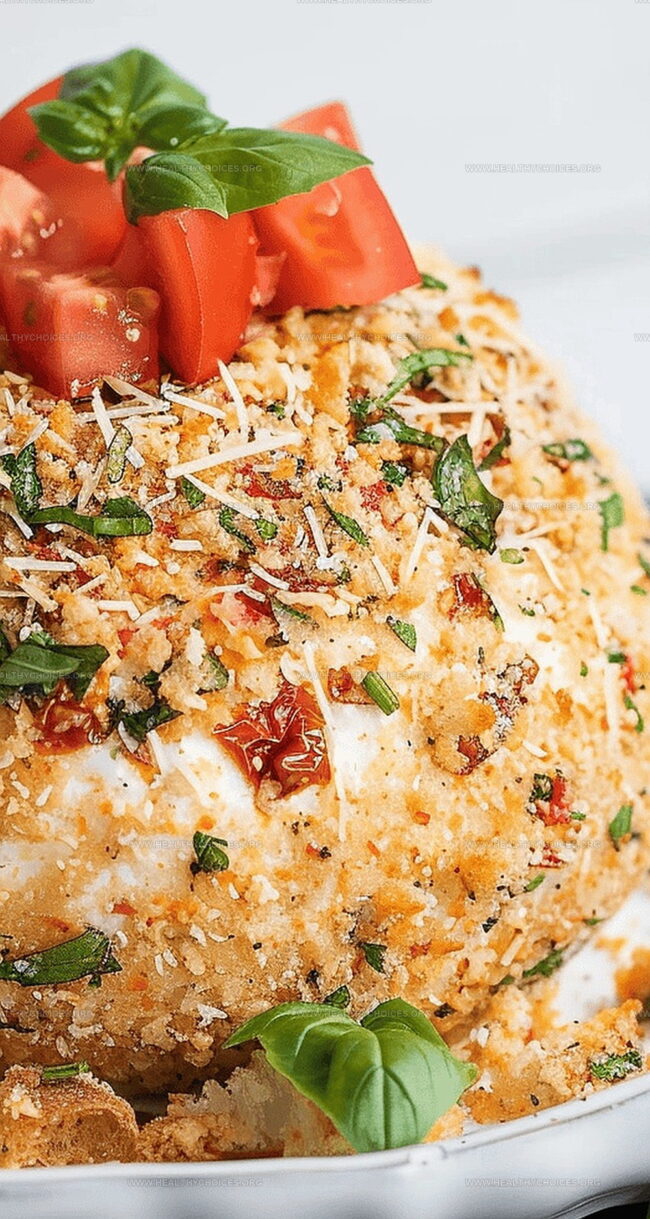
Separate sun-dried tomatoes into two sections – one for mixing into the cheese blend and another for decorative topping.
Blend cream cheese, shredded cheese, chopped sun-dried tomatoes, herbs, and seasonings in a mixing bowl until thoroughly combined.
Form the cheese mixture into a neat ball, wrap securely with plastic, and refrigerate until firm and well-set.
Gently toast panko breadcrumbs in butter over medium heat until they turn a beautiful golden color, stirring constantly.
Unwrap the chilled cheese ball and carefully roll it in the toasted breadcrumbs, ensuring complete and even coverage.
Sprinkle the remaining diced tomatoes and fresh basil leaves around the cheese ball for a vibrant and appetizing finish.
Arrange the cheese ball on a serving platter surrounded by crisp baguette slices, assorted crackers, or fresh vegetable sticks for dipping.
Flavor Ideas for Bruschetta Cheese Ball
Best Ways to Present Bruschetta Cheese Ball
Store Your Bruschetta Cheese Ball Properly
Print
Rustic Bruschetta Cheese Ball
- Total Time: 15 minutes
- Yield: 9 1x
Description
Classic Italian bruschetta cheese ball combines creamy textures with zesty Mediterranean flavors. Garlic, basil, and tomatoes meld together, creating a crowd-pleasing appetizer you’ll want to share with friends.
Ingredients
- 12.35 oz (350 g) cream cheese
- 1 cup shredded cheese mix (mozzarella, parmesan)
- ½ cup olives, chopped
- ½ cup oil-packed sun-dried tomatoes, divided
- ½ cup fresh basil, chopped
- 1 tomato, diced
- 2 cloves garlic, minced
- 2 tsps dried oregano
- 1 tsp salt
- 1 tsp black pepper
- 1 cup panko breadcrumbs
- 1 tbsp butter
- Fresh basil leaves, for garnish
Instructions
- Tomato Preparation: Divide sun-dried tomatoes into two portions – one for blending into the cheese mixture and another for garnishing.
- Flavor Fusion: Combine cream cheese, shredded cheese, chopped sun-dried tomatoes, basil, olives, garlic, oregano, and seasonings in a mixing bowl. Blend thoroughly until achieving a smooth, uniform consistency.
- Cheese Ball Formation: Shape the seasoned cheese mixture into a compact, symmetrical sphere, ensuring even density and texture.
- Chilling Process: Envelop the cheese ball tightly in plastic wrap and refrigerate for at least 30 minutes to solidify and intensify flavors.
- Breadcrumb Transformation: Toast panko breadcrumbs in a skillet over medium heat, stirring continuously until achieving a golden, crisp texture with a rich, nutty essence.
- Coating Application: Carefully unwrap the chilled cheese ball and roll its surface completely in the toasted breadcrumbs, applying gentle, consistent pressure for comprehensive coverage.
- Artistic Garnishing: Embellish the exterior with reserved diced sun-dried tomatoes and delicate fresh basil leaves, creating an elegant and visually striking presentation.
- Serving Suggestion: Plate the bruschetta cheese ball alongside crusty baguette slices, artisan crackers, or fresh vegetable crudités for an sophisticated appetizer experience.
Notes
- Tomato Prep Tip: Chop sun-dried tomatoes into two portions – one for blending into cheese mixture, the other for garnishing, ensuring maximum flavor distribution and visual appeal.
- Cheese Mixing Technique: Blend ingredients thoroughly until smooth, allowing each component to integrate fully, creating a rich and balanced flavor profile.
- Chilling Importance: Refrigerate cheese ball for at least 30 minutes to firm up texture and allow flavors to meld, resulting in a more cohesive and intense taste experience.
- Breadcrumb Coating Trick: Toast panko breadcrumbs carefully in a skillet, stirring consistently to achieve a golden, crispy exterior that adds delightful crunch and nutty depth to the cheese ball.
- Prep Time: 15 minutes
- Cook Time: 0 minutes
- Category: Appetizer, Snacks
- Method: None
- Cuisine: Italian
Nutrition
- Serving Size: 9
- Calories: 320
- Sugar: 2 g
- Sodium: 600 mg
- Fat: 25 g
- Saturated Fat: 14 g
- Unsaturated Fat: 8 g
- Trans Fat: 0 g
- Carbohydrates: 18 g
- Fiber: 1 g
- Protein: 10 g
- Cholesterol: 60 mg
Emily Roberts
Content Creator & Kitchen Tips Specialist
Expertise
Dietary Planning, Public Health Nutrition, Nutritional Education, Content Development
Education
University of Illinois at Urbana-Champaign
Registered Dietitian Nutritionist (RDN)
Emily Roberts is our content specialist and registered dietitian at HealthyChoices.org. With her Master’s degree in Nutritional Sciences from the University of Illinois and her Registered Dietitian Nutritionist certification, Emily uses her deep nutrition knowledge to write helpful, easy-to-understand guides about healthy eating.
Her warm, practical advice empowers readers to confidently make healthier choices, turning everyday meals into simple moments of wellness and joy.