Stovetop Custard Cream Buns Recipe

Easy Stovetop Custard Cream Buns Recipe: Fluffy Sweet Delight

Stovetop custard cream buns represent a delightful culinary adventure for home bakers seeking comfort and indulgence.

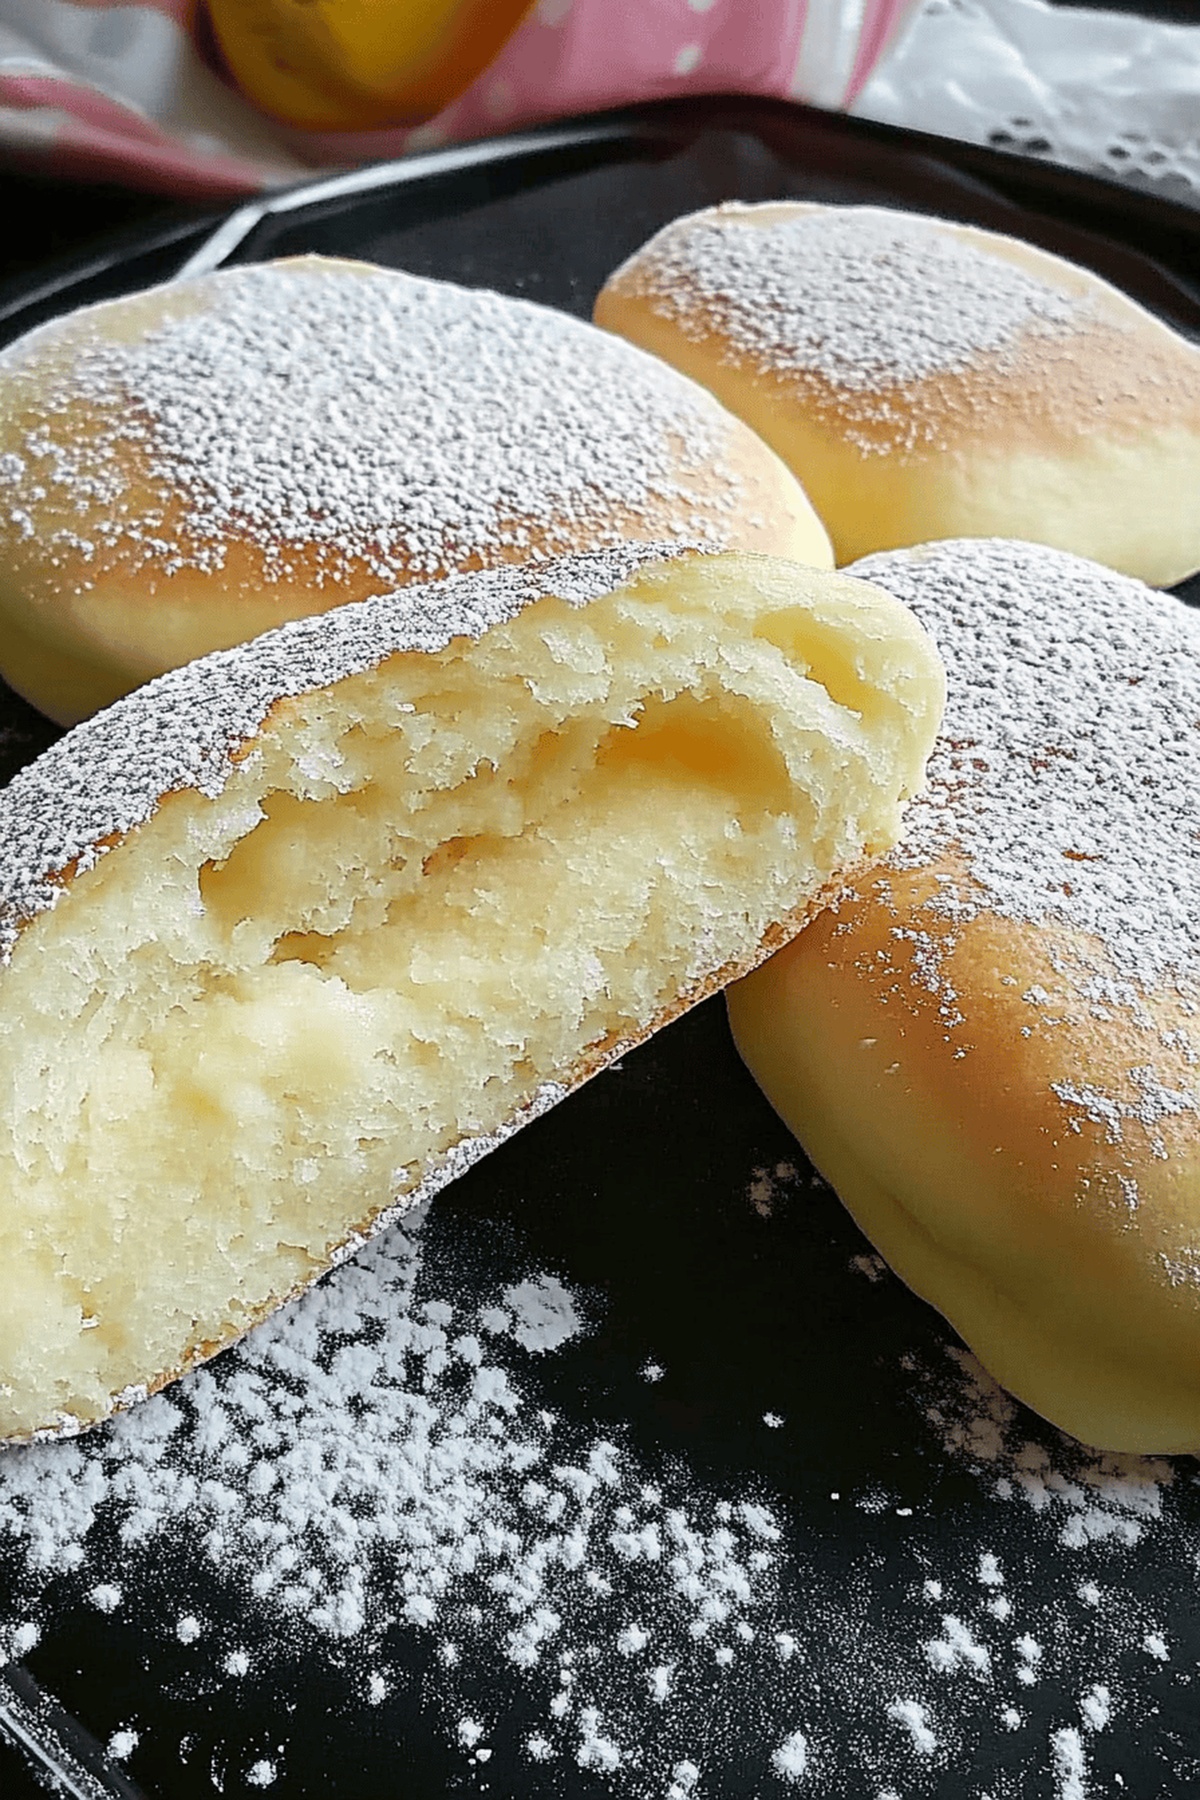
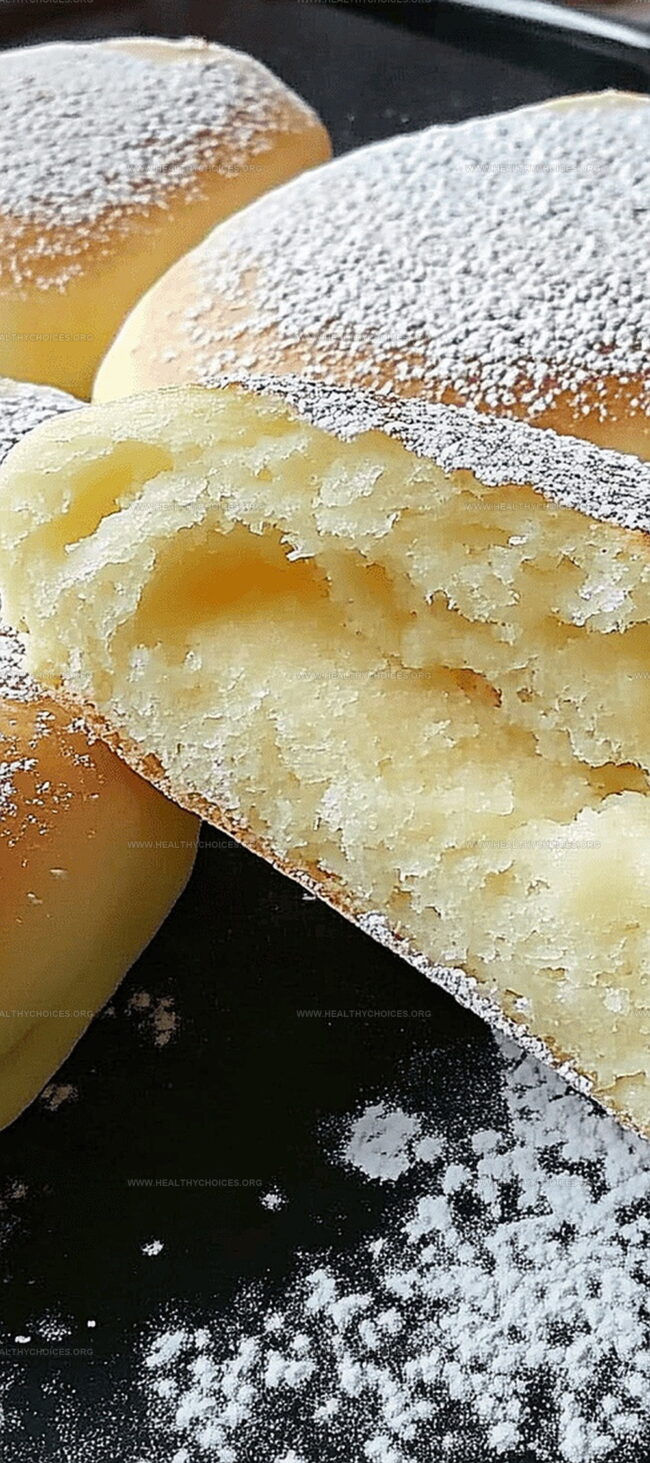
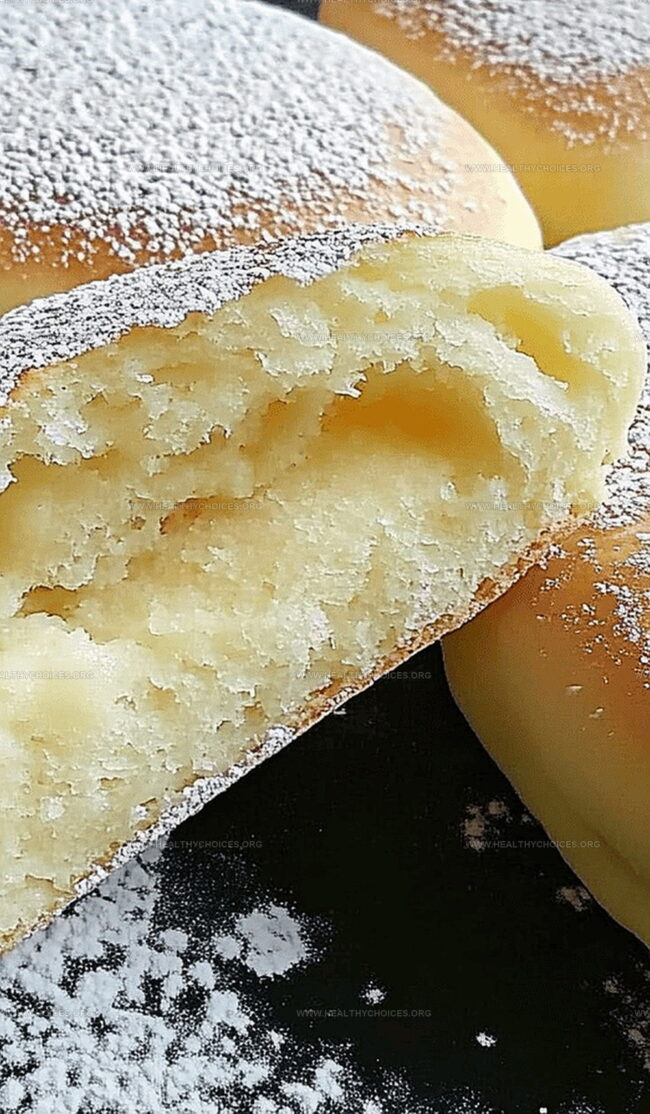
These soft, pillowy delicacies combine rich, silky filling with tender dough in an irresistible package.

Traditional pastry techniques merge seamlessly with modern cooking approaches, creating a sensational treat that awakens taste buds.

Sweet aromas waft through kitchens as these delectable buns revolutionize simple ingredients into something magical.

Delicate layers and creamy centers promise an experience that transcends ordinary dessert expectations.

Bakers of all skill levels can master this recipe with patience and enthusiasm.

The blend of textures and flavors guarantees a memorable dining moment.

Stovetop Custard Cream Buns You Can Make Anytime

  • Effortless Stovetop Magic: Create delectable custard cream buns without an oven, using just a simple non-stick pan and basic kitchen ingredients.
  • Silky Smooth Custard Delight: Enjoy a rich, creamy filling made from scratch with a perfect balance of sweet vanilla and velvety texture that melts in your mouth.
  • Quick and Comforting Treat: Whip up these soft, pillowy buns in just a few hours, perfect for satisfying sudden sweet cravings or impressing family and friends with minimal cooking skills.

Ingredients to Make Custard Cream Buns on the Stove

Dry Ingredients:
  • Flour: Soft, fine flour creates a tender bun base with smooth texture.
  • Yeast: Essential for dough rising and creating soft, airy bread texture.
  • Sugar: Adds sweetness and helps activate yeast for better dough development.
  • Salt: Enhances overall flavor and balances sweetness in the dough.
Liquid Ingredients:
  • Warm Water: Activates yeast and helps combine dough ingredients smoothly.
  • Milk: Provides richness and softness to both dough and custard filling.
  • Vegetable Oil: Ensures tender, moist dough with smooth mixing properties.
Custard Filling Ingredients:
  • Egg Yolk: Creates rich, creamy custard with smooth, luxurious texture.
  • Cornstarch: Thickens custard and provides silky, stable filling consistency.
  • Vanilla Extract: Adds warm, classic flavor to custard filling.
  • Sugar: Sweetens custard and balances overall taste profile.
Cooking Ingredient:
  • Oil (for brushing pan): Prevents buns from sticking and helps achieve golden crust.
Optional Finishing Ingredient:
  • Powdered Sugar: Light dusting adds elegant touch and extra sweetness.

Instructions for Fluffy Stovetop Cream-Filled Buns

Step 1: Prepare Dough Ingredients

Gather flour, active dry yeast, sugar, and salt in a large mixing bowl. These dry ingredients will form the base of your soft, delicious buns.

Step 2: Create Liquid Mixture

Warm water, milk, and vegetable oil in a saucepan. Ensure the liquid is comfortably warm but not hot enough to kill the yeast.

Step 3: Combine Wet and Dry Ingredients

  • Pour liquid mixture slowly into dry ingredients
  • Mix until a shaggy dough forms
  • Knead the dough for 5-7 minutes until smooth and elastic

Step 4: First Dough Rise

Cover the dough with a clean kitchen towel. Let it rest in a warm, cozy spot for 60-90 minutes until it doubles in size.

Step 5: Craft Silky Custard Filling

Ingredients for custard:
  • Whole milk
  • Egg yolks
  • Granulated sugar
  • Cornstarch
  • Vanilla extract

Step 6: Cook Custard Base

  • Heat milk until steaming
  • Whisk egg yolks, sugar, and cornstarch in a separate bowl
  • Slowly stream warm milk into egg mixture while whisking
  • Return to saucepan and cook until thickened
  • Remove from heat and stir in vanilla extract
  • Cool completely

Step 7: Shape Bun Pockets

  • Punch down risen dough
  • Divide into 12 equal portions
  • Roll each portion into a circle
  • Place custard in center of each circle
  • Fold and seal edges firmly

Step 8: Rest Bun Pockets

Allow filled buns to rest for 15-20 minutes, letting them rise slightly.

Step 9: Stovetop Cooking Method

  • Heat non-stick pan on low setting
  • Lightly brush with oil
  • Cook buns 10 minutes on first side
  • Flip and cook additional 5 minutes
  • Ensure golden brown color on both sides

Step 10: Serve and Garnish

  • Cool buns for a few minutes
  • Optional: Dust with powdered sugar
  • Serve warm and enjoy the creamy, soft texture
Tips:
  • Use room temperature ingredients
  • Maintain low heat while cooking
  • Don't overcrowd the pan
  • Allow buns to rest before serving for best texture

Custard Tips to Fill Buns Without Mess

  • Activate Yeast Perfectly: Ensure water and milk are warm (not hot) to prevent killing the yeast, which helps the dough rise beautifully and creates soft, fluffy buns.
  • Control Dough Consistency: Add liquid gradually while mixing to achieve the right texture- smooth and slightly tacky but not sticky, guaranteeing tender buns.
  • Master Custard Technique: Whisk egg mixture constantly when adding warm milk to prevent scrambling and create a silky, lump-free custard filling.
  • Seal Buns Carefully: Press edges firmly when folding to prevent custard leakage during cooking, creating neat, well-contained pastries.
  • Manage Stovetop Temperature: Cook buns on low heat to ensure even browning and thorough cooking without burning the delicate dough exterior.

Store and Reheat Custard Cream Buns Without Drying Out

  • Refrigerate: Store leftover custard buns in an airtight container and keep them in the refrigerator for up to 3 days. Wrap each bun individually in plastic wrap to prevent them from drying out.
  • Reheat Stovetop: Warm the buns in a non-stick pan over low heat for 2-3 minutes on each side. Add a few drops of water to the pan to help restore moisture and prevent the buns from becoming too dry.
  • Microwave Option: Place a bun on a microwave-safe plate, cover with a damp paper towel, and heat for 20-30 seconds. The paper towel helps maintain the bun's softness and prevents hardening.

Serve These Buns With Coffee or Tea

  • Pair with Creamy Chai Latte: Complement the rich, sweet custard buns with a warm, spiced chai latte. The aromatic blend of cardamom, cinnamon, and ginger will enhance the delicate flavors of the buns, creating a perfect balance of sweetness and warmth.
  • Serve with Fresh Berry Compote: Add a bright, tangy counterpoint to the creamy custard by serving a small bowl of mixed berry compote. The fresh, slightly tart berries will cut through the richness of the buns and provide a refreshing contrast.
  • Match with Vanilla Bean Ice Cream: Elevate the dessert experience by adding a scoop of smooth vanilla bean ice cream alongside the warm custard buns. The cold, creamy texture will create a delightful temperature and flavor contrast that will make each bite more exciting.
  • Pair with Light White Wine: For an elegant touch, serve a chilled glass of Moscato or Riesling. These sweet, light wines will complement the custard's sweetness and provide a sophisticated accompaniment to the buns.

Variations to Fill and Top Custard Buns

  • Chocolate Custard Delight: Infuse the custard with cocoa powder for a rich chocolate flavor, creating a decadent filling that chocolate lovers will adore.
  • Fruit-Filled Fusion: Replace the vanilla custard with a vibrant fruit compote like strawberry or mango, adding a fresh and tangy twist to the traditional bun.
  • Savory Cheese Edition: Transform the sweet custard into a savory version by mixing in grated cheese and herbs, perfect for those craving a more robust flavor profile.
  • Nutty Caramel Crunch: Incorporate chopped nuts and a drizzle of caramel sauce into the custard filling, providing a delightful texture and extra layer of sweetness.
Print
clock clock iconcutlery cutlery iconflag flag iconfolder folder iconinstagram instagram iconpinterest pinterest iconfacebook facebook iconprint print iconsquares squares iconheart heart iconheart solid heart solid icon
Stovetop Custard Cream Buns Recipe

Stovetop Custard Cream Buns Recipe


5 Stars 4 Stars 3 Stars 2 Stars 1 Star

4.6 from 36 reviews

  • Total Time: 35 minutes
  • Yield: 12 1x

Description

Stovetop custard cream buns bring silky Portuguese-inspired comfort straight to your kitchen. Sweet vanilla-infused pastry cream nestles inside pillowy enriched dough, promising a delightful culinary journey you’ll savor with each tender, creamy bite.


Ingredients

Scale

Main Ingredients (Flour and Protein):

  • 1 ¾ cups (220 grams) all-purpose or cake flour
  • 1 egg yolk

Leavening and Sweeteners:

  • 1 teaspoon instant dry yeast
  • 1 tablespoon white granulated or castor sugar
  • 2 tablespoons sugar (for custard)

Liquids and Fats:

  • ½ cup (120 milliliters) warm water
  • ½ cup (120 milliliters) milk
  • 1 tablespoon milk
  • 1 tablespoon canola or sunflower oil

Flavor Enhancers and Thickeners:

  • ⅓ teaspoon salt
  • 1 tablespoon cornstarch
  • 1 teaspoon vanilla extract

Instructions

  1. Combine flour, yeast, sugar, and salt in a spacious mixing vessel, creating a foundation for the dough.
  2. Warm milk, water, and oil in a separate container, then gradually incorporate the liquid into the dry ingredients, forming a cohesive mixture.
  3. Vigorously massage the dough for approximately 5 minutes until achieving a silky, elastic texture.
  4. Drape a clean cloth over the dough and allow it to expand and rise in a sheltered, tepid environment for one hour.
  5. Gently heat milk in a saucepan until it reaches a warm temperature, avoiding boiling.
  6. Whisk egg yolks, sugar, and cornstarch in a separate bowl, creating a smooth custard base.
  7. Carefully stream the warm milk into the egg mixture, continuously whisking to prevent curdling.
  8. Transfer the liquid back to the saucepan, cooking over medium heat while stirring until the mixture thickens and becomes pudding-like.
  9. Remove from heat, infuse with vanilla extract, and allow the custard to cool completely.
  10. Deflate the risen dough with gentle kneading for 3 minutes to release trapped air.
  11. Partition the dough into 12 uniform portions, rolling each into a circular shape.
  12. Position a dollop of cooled custard on one half of each dough circle, then fold and seal the edges meticulously.
  13. Let the assembled buns rest and slightly proof for 15 minutes.
  14. Prepare a non-stick pan with a delicate oil coating over low heat.
  15. Carefully place the buns in the pan, cooking for 10 minutes on one side until golden.
  16. Flip the buns and continue cooking for an additional 5 minutes, ensuring even browning.
  17. Transfer the cooked buns to a cooling rack, allowing them to settle slightly.
  18. Optionally, dust with a light snowfall of powdered sugar before serving.

Notes

  • Prepare all ingredients beforehand to ensure a smooth baking process and minimize kitchen stress.
  • Use warm (not hot) liquid ingredients to activate yeast correctly without killing it, creating soft and fluffy dough.
  • Constant whisking prevents custard from burning and ensures a smooth, creamy texture without lumps.
  • Low and slow stovetop cooking helps achieve golden-brown buns with perfectly cooked interiors.
  • Sealing bun edges tightly prevents custard from leaking during cooking, maintaining a clean and attractive appearance.
  • Allow buns to rest before and after cooking to develop better flavor and achieve ideal texture.
  • Prep Time: 20 minutes
  • Cook Time: 15 minutes
  • Category: Desserts, Snacks
  • Method: Frying
  • Cuisine: Chinese

Nutrition

  • Serving Size: 12
  • Calories: 200
  • Sugar: 6 g
  • Sodium: 150 mg
  • Fat: 7 g
  • Saturated Fat: 1 g
  • Unsaturated Fat: 5 g
  • Trans Fat: 0 g
  • Carbohydrates: 30 g
  • Fiber: 1 g
  • Protein: 4 g
  • Cholesterol: 35 mg
David Bennett

David Bennett

Founder & Head Recipe Developer

Expertise

Culinary Nutrition​, Recipe Development​, Nutritional Counseling​, Food Science​

Education

Johnson & Wales University

  • Degree: Bachelor of Science in Culinary Nutrition
  • Focus: Blending culinary arts with nutritional science to create health-focused cuisine.

Certified Nutrition Specialist® (CNS®)

  • Credential: Advanced certification in personalized nutrition therapy. ​

David Bennett is the lead recipe creator and nutrition expert at HealthyChoices.org, your friendly space for tasty meals that nourish body and mind. 

With a Culinary Nutrition degree from Johnson & Wales University and a Certified Nutrition Specialist® credential, David pairs practical nutrition with delicious cooking, creating recipes you’ll crave daily. 

At Healthy Choices, David shares easy, nutritious dishes and smart cooking tips to make healthy eating something everyone can enjoy, with no complicated diets needed.

Leave a Reply

Your email address will not be published. Required fields are marked *

Recipe rating 5 Stars 4 Stars 3 Stars 2 Stars 1 Star