
Quick & Cute Mini Key Lime Pie Recipe: No Baking Required
Summer’s golden rays call for a zesty key lime pie recipe that requires zero oven time.
This delightful no bake key lime pie delivers pure tropical bliss in every creamy bite.
Cool, tangy flavors dance across your palate with minimal effort and maximum satisfaction.
Graham cracker crusts provide a crisp foundation for the silky smooth filling bursting with citrusy brightness.
Fresh lime juice and condensed milk blend into a dreamy mixture that sets perfectly without baking.
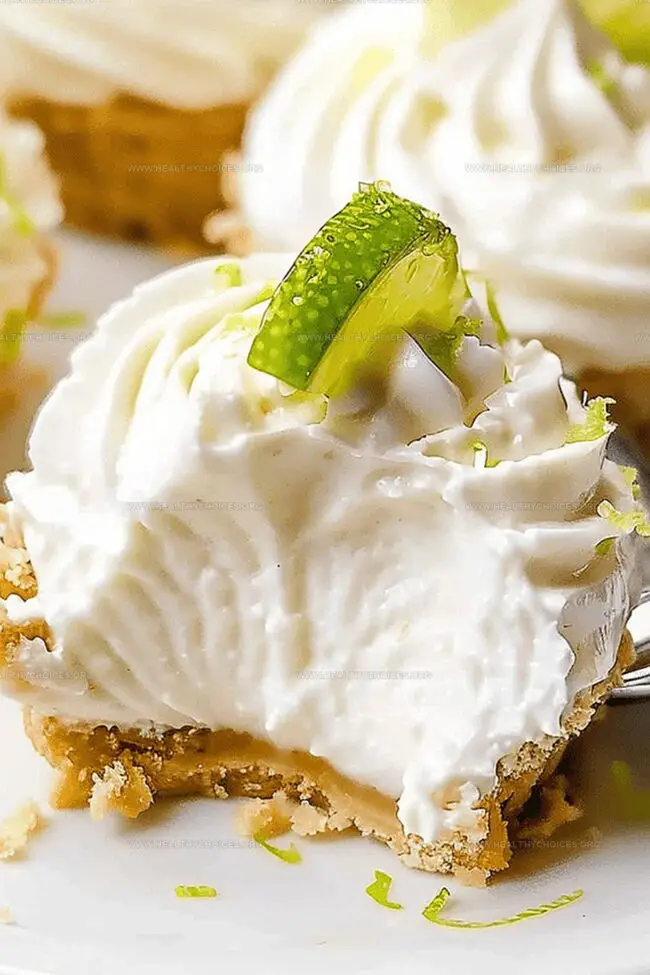
Chilled and garnished with whipped cream, this dessert promises to be the star of any gathering.
Get ready to wow everyone with this simple yet spectacular treat that screams sunshine and sweet relaxation.
Quick Recipe Overview
Key Lime Pie Ingredients for a Tart Mini Dessert
For The Crust:For The Filling:For Topping:Tools to Prepare Mini Key Lime Pies Fast
Steps to Whip Up These No-Bake Pies

Crush graham crackers into fine, sandy texture. Mix thoroughly with melted butter until perfectly blended. This creates a delightful, crispy base for your tropical dessert.
Whip softened cream cheese until silky smooth in a large bowl. Pour in sweet, condensed milk and blend until completely integrated. Add zesty key lime juice, stirring until mixture becomes velvety and uniform.
Gently incorporate whipped cream into the lime mixture, creating a light, airy texture. Fold carefully to maintain the delicate, cloudlike consistency.
Carefully spoon the lime mixture into individual silicone cups, filling about three-quarters full. Sprinkle crushed graham cracker mixture on top for a delightful crunch.
Place filled cups in freezer for several hours until perfectly set. The cold transforms the creamy mixture into a refreshing, firm dessert.
Remove pies from freezer. Let sit briefly at room temperature. Carefully release from molds by briefly dipping bottom in warm water. Flip onto serving plate with graham cracker layer facing down. Optional: Garnish with extra whipped cream and tiny lime slice for a restaurant-worthy presentation.
Tips to Customize Your Lime Pie Flavor
Serve Mini Pies for Summer Gatherings
Store Mini Pies in the Fridge Smoothly
Print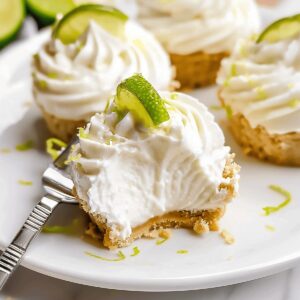
Zesty Mini No Bake Key Lime Pie Recipe
- Total Time: 4 hours 20 minutes
- Yield: 9 1x
Description
Key lime pie delights dessert enthusiasts with its creamy, tangy profile. Chilled graham cracker crust and zesty lime filling create a refreshing summer classic you’ll crave repeatedly.
Ingredients
- 1 (14 oz/397 g) can sweetened condensed milk
- 8 oz (226 g) cream cheese, softened
- 8 oz (226 g) whipped topping, plus more for garnish
- 0.75 cup (180 mL) key lime juice, freshly squeezed (about a pound of key limes or good bottled key lime juice)
- 1.5 cups graham cracker crumbs (or 1 sleeve graham crackers)
- 4 oz (113 g) unsalted butter, melted
Instructions
- Crust Preparation: Crush graham crackers into fine crumbs and blend thoroughly with melted butter, creating a compact, uniform base mixture that will serve as the crisp foundation for the mini pies.
- Cream Cheese Blending: Utilize an electric mixer to whip cream cheese until achieving a silky, completely smooth consistency, eliminating any potential lumps and preparing a perfect base for subsequent ingredients.
- Milk and Cheese Integration: Gradually pour sweetened condensed milk into the cream cheese, mixing meticulously to create a uniform, glossy mixture with seamless incorporation of both components.
- Flavor Infusion: Add freshly squeezed key lime juice and blend continuously, ensuring even distribution of the citrusy essence throughout the creamy filling to develop a balanced, tangy flavor profile.
- Texture Enhancement: Fold whipped topping into the lime-infused mixture using gentle motions, preserving the light, airy structure while creating a luxurious, creamy consistency.
- Assembly and Freezing: Distribute the key lime filling into silicone cups or cupcake liners, leaving space for the graham cracker topping, then sprinkle the prepared crumb mixture over each mini pie before transferring to the freezer for a minimum of four hours to set completely.
- Serving Presentation: Remove pies from freezer, briefly submerge molds in warm water to facilitate easy release, and plate with graham cracker layer facing downward, optionally garnishing with additional whipped cream and a delicate key lime slice for an elegant finish.
Notes
- Crumb Crust Mastery: Crush graham crackers finely and mix thoroughly with melted butter to create a sturdy, crisp foundation that holds the mini pie’s structure perfectly.
- Cream Cheese Technique: Beat cream cheese until completely smooth and lump-free, ensuring a silky base for the filling that blends seamlessly with other ingredients.
- Freezing Precision: Freeze mini pies for at least 4 hours to achieve optimal texture, allowing flavors to meld and create a perfectly set dessert.
- Serving Tip: Briefly dip molds in warm water to release mini pies without damaging their delicate shape, presenting them with graham cracker base facing down for an elegant finish.
- Prep Time: 20 minutes
- Cook Time: 0 minutes
- Category: Desserts, Snacks
- Method: Blending
- Cuisine: American
Nutrition
- Serving Size: 9
- Calories: 300
- Sugar: 22 g
- Sodium: 150 mg
- Fat: 18 g
- Saturated Fat: 10 g
- Unsaturated Fat: 8 g
- Trans Fat: 0 g
- Carbohydrates: 32 g
- Fiber: 1 g
- Protein: 3 g
- Cholesterol: 40 mg
Emily Roberts
Content Creator & Kitchen Tips Specialist
Expertise
Dietary Planning, Public Health Nutrition, Nutritional Education, Content Development
Education
University of Illinois at Urbana-Champaign
Registered Dietitian Nutritionist (RDN)
Emily Roberts is our content specialist and registered dietitian at HealthyChoices.org. With her Master’s degree in Nutritional Sciences from the University of Illinois and her Registered Dietitian Nutritionist certification, Emily uses her deep nutrition knowledge to write helpful, easy-to-understand guides about healthy eating.
Her warm, practical advice empowers readers to confidently make healthier choices, turning everyday meals into simple moments of wellness and joy.