
Cheesy Family-Night Sheet Pan Quesadillas Recipe
Sizzling cheese and golden-brown tortillas make sheet pan quesadillas a game-changing meal that comes together in a flash.
This hack turns a potentially tedious cooking process into a simple, crowd-pleasing feast.
No more standing over the stove flipping individual quesadillas one by one.
The sheet pan method delivers crispy edges and melted goodness with minimal effort.
Packed with vibrant ingredients and bursting with flavor, these quesadillas promise a delightful dinner solution for busy nights.
Layers of savory fillings nestled between tortillas create a mouthwatering dish everyone will devour.
Dive into this easy recipe and watch as dinner becomes an effortless, delicious celebration.
Quick Recipe Overview
Ingredients for Loaded Sheet Pan Quesadillas
For Flavor Boosters:For Vegetable and Protein Base:For Assembly and Topping:Tools That Help You Crisp Up Quesadillas
Equipment & Tools:Instructions for Assembling and Baking in One Pan

Warm a skillet and dance some olive oil with bell peppers and onions, letting them soften and release their sweet flavors for about 5 minutes.
Add ground beef and garlic, letting them mingle and brown completely, creating a rich and savory base.
Stir in zesty spices and fun extras like black beans, olives, and salsa to create a mouth-watering mixture that’ll make taste buds dance.
Take a sheet pan and create a delicious landscape by laying tortillas around the edges, overlapping them like a cozy blanket with an inviting center gap.
Spread the spicy meat mixture across the tortilla foundation, then generously sprinkle cheese and fresh green onions for color and crunch.
Carefully fold the tortilla edges towards the center, creating a neat parcel that holds all the delicious ingredients inside.
Bake in a hot oven until the edges turn golden and crispy, creating a crunchy exterior with a molten interior.
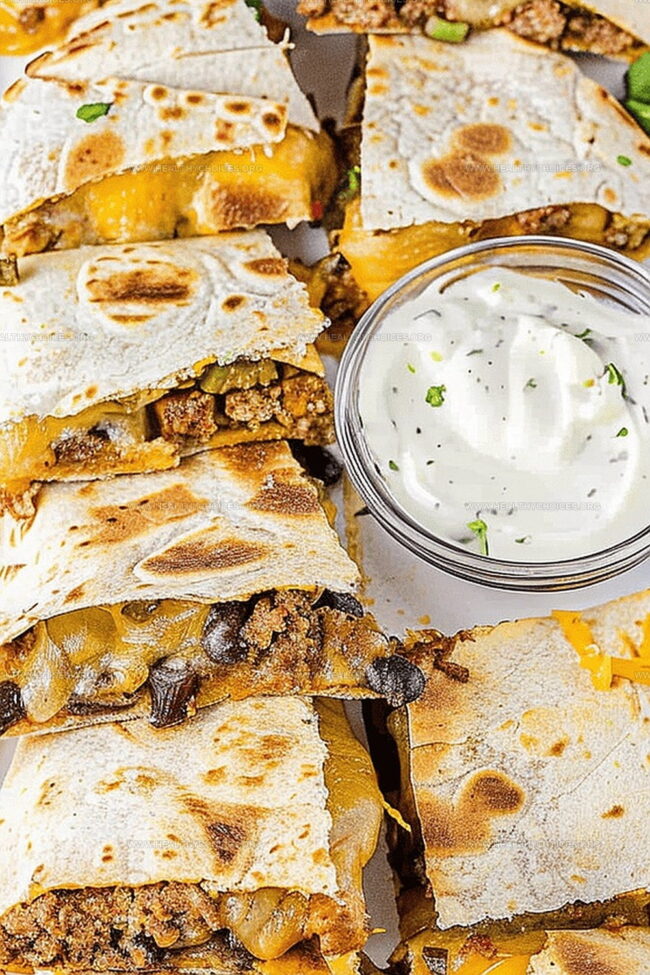
Let the quesadilla cool slightly, then slice into wedges and serve with a dollop of cool sour cream for a perfect flavor balance.
Flavor Combos You Can Experiment With
Serve Quesadillas for Parties or Quick Dinners
Save Extras for Another Round of Snacking
Print
Cheesy Sheet Pan Quesadillas
- Total Time: 40 minutes
- Yield: 9 1x
Description
Delicious sheet pan quesadillas combine crispy tortillas with melted cheese and savory fillings for a crowd-pleasing meal. Mexican-inspired comfort delivers quick satisfaction that brings families and friends together around the table.
Ingredients
- 1 lbs (pound) ground beef
- 15 oz black beans, drained and rinsed
- 2.25 oz sliced black olives, drained and rinsed
- 3 cups Colby and Monterey Jack cheese, shredded
- 8 large flour tortillas (burrito size)
- 1 bell pepper, seeded and diced
- 1 small yellow onion, diced
- 2 green onions, sliced thin
- 0.5 cup salsa
- 1.5 tbsps olive oil
- 1 teaspoon minced garlic
- 1.5 teaspoons chili powder
- 1.5 teaspoons cumin
- 1.5 teaspoons smoked paprika
- 1 teaspoon kosher salt
- 1 teaspoon black pepper
- Sour cream to top quesadillas (optional)
Instructions
- Preparation: Preheat oven to 425°F and lightly spray one sheet pan with nonstick cooking spray.
- Vegetable Sauté: In a large skillet, caramelize bell peppers and yellow onion in olive oil until tender and fragrant.
- Meat Mixture: Add ground beef and minced garlic to the skillet, browning thoroughly and draining excess fat. Incorporate chili powder, cumin, paprika, kosher salt, black pepper, black beans, black olives, and salsa, blending spices and ingredients completely.
- Tortilla Foundation: Layer tortillas around the sheet pan’s edges, overlapping and hanging slightly, with an additional tortilla in the center to create a circular base.
- Layering: Spread the seasoned meat mixture evenly across the tortilla base, generously top with cheese and sliced green onions, then cover with a final tortilla.
- Sealing and Baking: Fold hanging tortilla edges towards the center, place a second sheet pan on top to secure, and bake for 20 minutes. Remove top pan and continue baking for an additional 5 minutes until golden-brown.
- Serving: Allow quesadilla to rest briefly, slice, and serve with a cool sour cream garnish.
Notes
- Precise Pan Preparation: Use nonstick spray generously to prevent sticking and ensure easy removal of the quesadilla.
- Meat Mastery: Drain excess fat completely to maintain a crisp texture and prevent a greasy final dish.
- Layering Technique: Overlap tortillas strategically to create a secure base that holds the filling without falling apart.
- Temperature Control: Allow the quesadilla to rest briefly after baking to let the filling set and make slicing easier.
- Prep Time: 10 minutes
- Cook Time: 30 minutes
- Category: Lunch, Dinner, Snacks
- Method: Baking
- Cuisine: Mexican
Nutrition
- Serving Size: 9
- Calories: 500
- Sugar: 2 g
- Sodium: 800 mg
- Fat: 25 g
- Saturated Fat: 10 g
- Unsaturated Fat: 12 g
- Trans Fat: 0 g
- Carbohydrates: 45 g
- Fiber: 6 g
- Protein: 28 g
- Cholesterol: 70 mg
Emily Roberts
Content Creator & Kitchen Tips Specialist
Expertise
Dietary Planning, Public Health Nutrition, Nutritional Education, Content Development
Education
University of Illinois at Urbana-Champaign
Registered Dietitian Nutritionist (RDN)
Emily Roberts is our content specialist and registered dietitian at HealthyChoices.org. With her Master’s degree in Nutritional Sciences from the University of Illinois and her Registered Dietitian Nutritionist certification, Emily uses her deep nutrition knowledge to write helpful, easy-to-understand guides about healthy eating.
Her warm, practical advice empowers readers to confidently make healthier choices, turning everyday meals into simple moments of wellness and joy.